Website & Booking Module
Build your salon website, customise your booking page, connect social media links, and manage online bookings
NxCut includes a full Website Builder that lets you create a professional salon website and an online booking module — no coding or design experience needed. Clients can visit your site to browse services, pick a staff member, choose a time, and book an appointment.
Click the globe icon in the left menu to manage your website and booking settings.
The Website section is accessible to admin users and is secured with Single Sign-On (SSO) authentication to keep your online configuration safe.
At the top right of the page you will find two quick-access buttons:
- Booking Page — opens your live client booking page in a new tab
- My Website — opens your full salon website
Website Builder overview
The Website Builder is split into sections that let you customise every part of your online presence:
| Section | What you can do |
|---|---|
| Edit Profile | Update your salon's name, contact info, and owner details |
| Website Details | Customise your logo, page title, and landing page image |
| Contact Us | Manage the contact details shown to clients |
| Booking Settings | Control how the booking flow works for clients |
| Social Media Links | Connect direct booking links across Instagram, Facebook, TikTok, and WhatsApp |
Edit your profile
The first section lets you update your salon's basic public information.
| Field | What it is for |
|---|---|
| Salon Name | The name displayed on your booking page and website |
| Mobile Number | Your salon's contact number |
| Email Address | Your contact email |
| Owner Name | The name of the salon owner |
| Website | Your auto-generated booking URL (read-only) |
Click Save Changes when done.
Website Details
Customise how your booking page and website look to clients.
| Field | What it is for |
|---|---|
| Logo Text | The text displayed as your logo |
| Website Title | The page title shown in the browser tab |
| Landing Page Image | The hero image at the top of your booking page (PNG, JPG, GIF or WebP, max 5MB) |
Click Upload Image to add or replace the landing page photo, then click Save Changes.
Your landing page image is the first thing clients see. Use a high-quality photo of your salon interior, a signature treatment, or your storefront to make a great first impression.
Adding your salon logo
You can upload your salon's logo to appear on the booking page and website. The logo is shown prominently at the top of the page, helping clients recognise your brand.
Go to the Website Details section.
Click Upload Logo and select your logo file (PNG, JPG, or SVG recommended).
The logo preview updates immediately. Click Save Changes to apply.
Connecting Social Media Booking Links
Connecting your direct booking link to your social media profiles allows clients to book appointments 24/7 directly from your posts and profiles.
1. Instagram
- In NxCut Website settings, copy your Booking Page URL.
- Open your salon's Instagram profile on mobile and tap Edit Profile.
- Tap Links → Add External Link, paste your booking URL, and set the title to "Book an Appointment".
- (Optional for Professional Accounts) Tap Action Buttons → Book Now and paste your NxCut link.
2. Facebook Page
- Go to your salon's Facebook business page on desktop or mobile.
- Click + Add an Action Button (or edit your existing button).
- Select Book Now → Link to Website.
- Paste your NxCut booking URL and save.
3. TikTok
- On your TikTok Business Account profile, tap Edit Profile.
- In the Website field under business information, paste your NxCut booking URL.
- Add a call-to-action in your bio (e.g. "Tap the link below to book online!").
4. WhatsApp Business
- In WhatsApp Business settings, go to Business Tools → Business Profile.
- Paste your booking URL into the Website field.
- Under Greeting Message or Quick Replies, include your booking link so clients who message you can immediately self-book.
Looking to showcase live Instagram & Facebook Reels on your storefront?
Check out our complete Meta Integration Guide to set up 1-click OAuth connections, automated token renewal, and live video feeds directly in Theme Settings.
How the client booking flow works
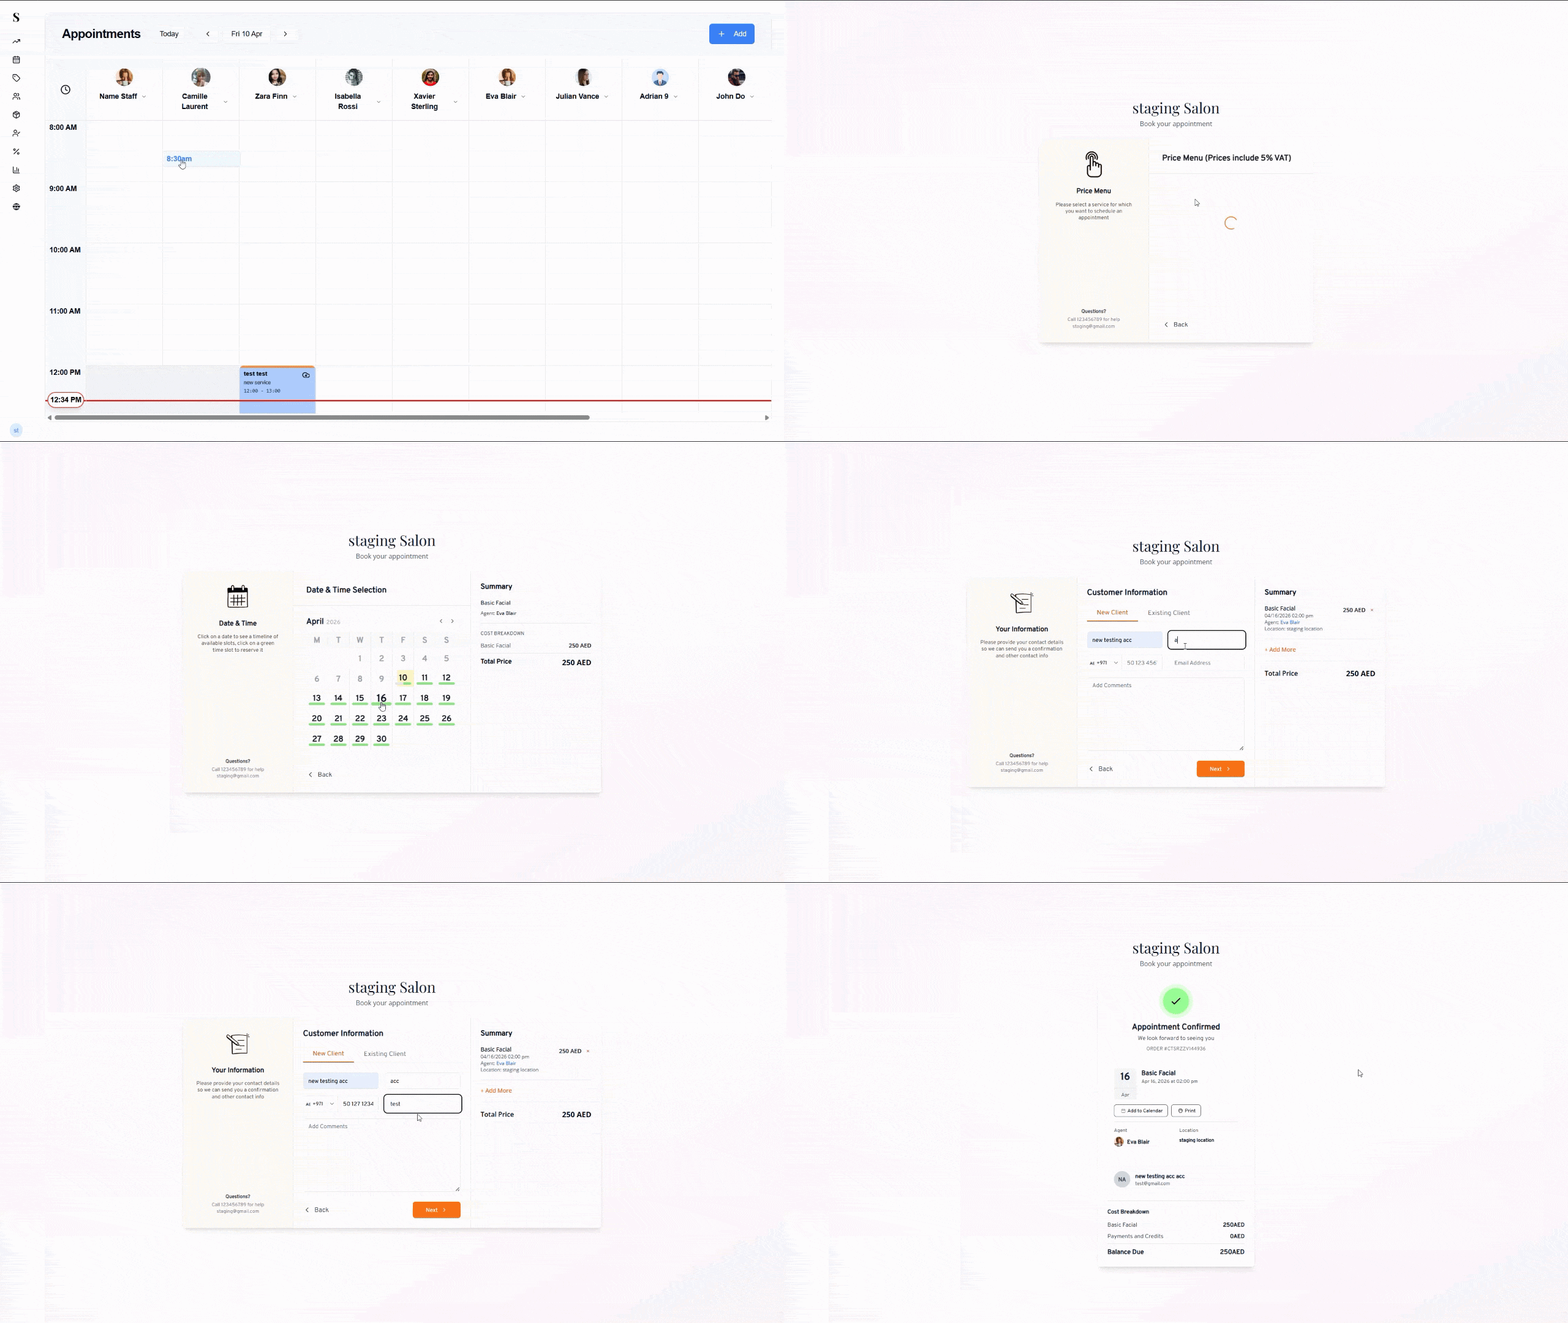
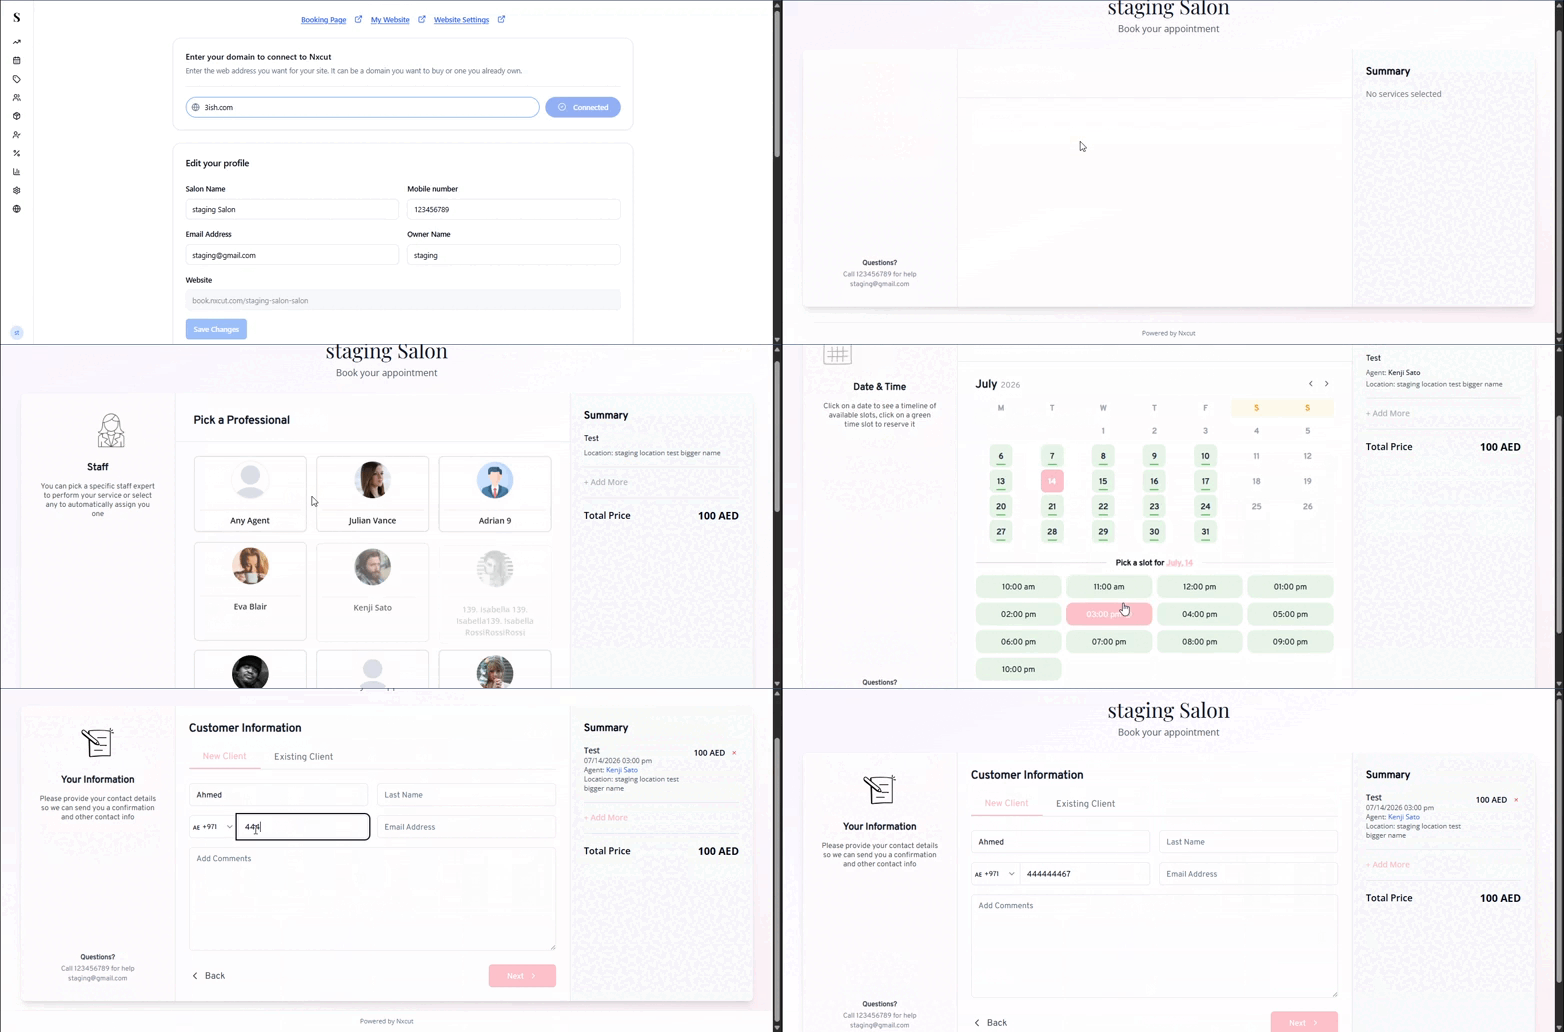
When a client visits your booking page, they go through a simple step-by-step process:
Step 1 — Select a location
The client picks which branch they want to visit. If you only have one location, this step is skipped automatically.
Step 2 — Browse the price menu
Services are grouped by category (Facial, Hair, Nails, etc.). Prices include 5% VAT. The client taps a category to see the individual services and their prices, then selects the one they want.
Step 3 — Pick a professional
The client chooses which staff member they would like. They can pick a specific person or select Any Agent to be assigned to whoever is available.
Step 4 — Choose a date and time
A calendar shows the current month. Days with available slots are marked with a green underline. The client clicks a date to see the available time slots for that day, then taps a green slot to reserve it.
A Summary panel on the right shows the selected service, agent, and total price. The client can also click + Add More to add additional services to the same booking.
Step 5 — Enter contact details
The client fills in their information:
- New Client — enters their details for the first time
- Existing Client — enters their registered phone number to pull up their profile
They can also add any special requests or notes in the Additional Comments field.
Step 6 — Appointment confirmed
After submitting, a confirmation screen appears showing:
- A green Appointment Confirmed message
- A unique ORDER # for reference
- The date, time, service, agent, and location
- Add to Calendar and Print buttons
- A full Cost Breakdown showing the service price, any credits applied, and the balance due
Confirming Booking
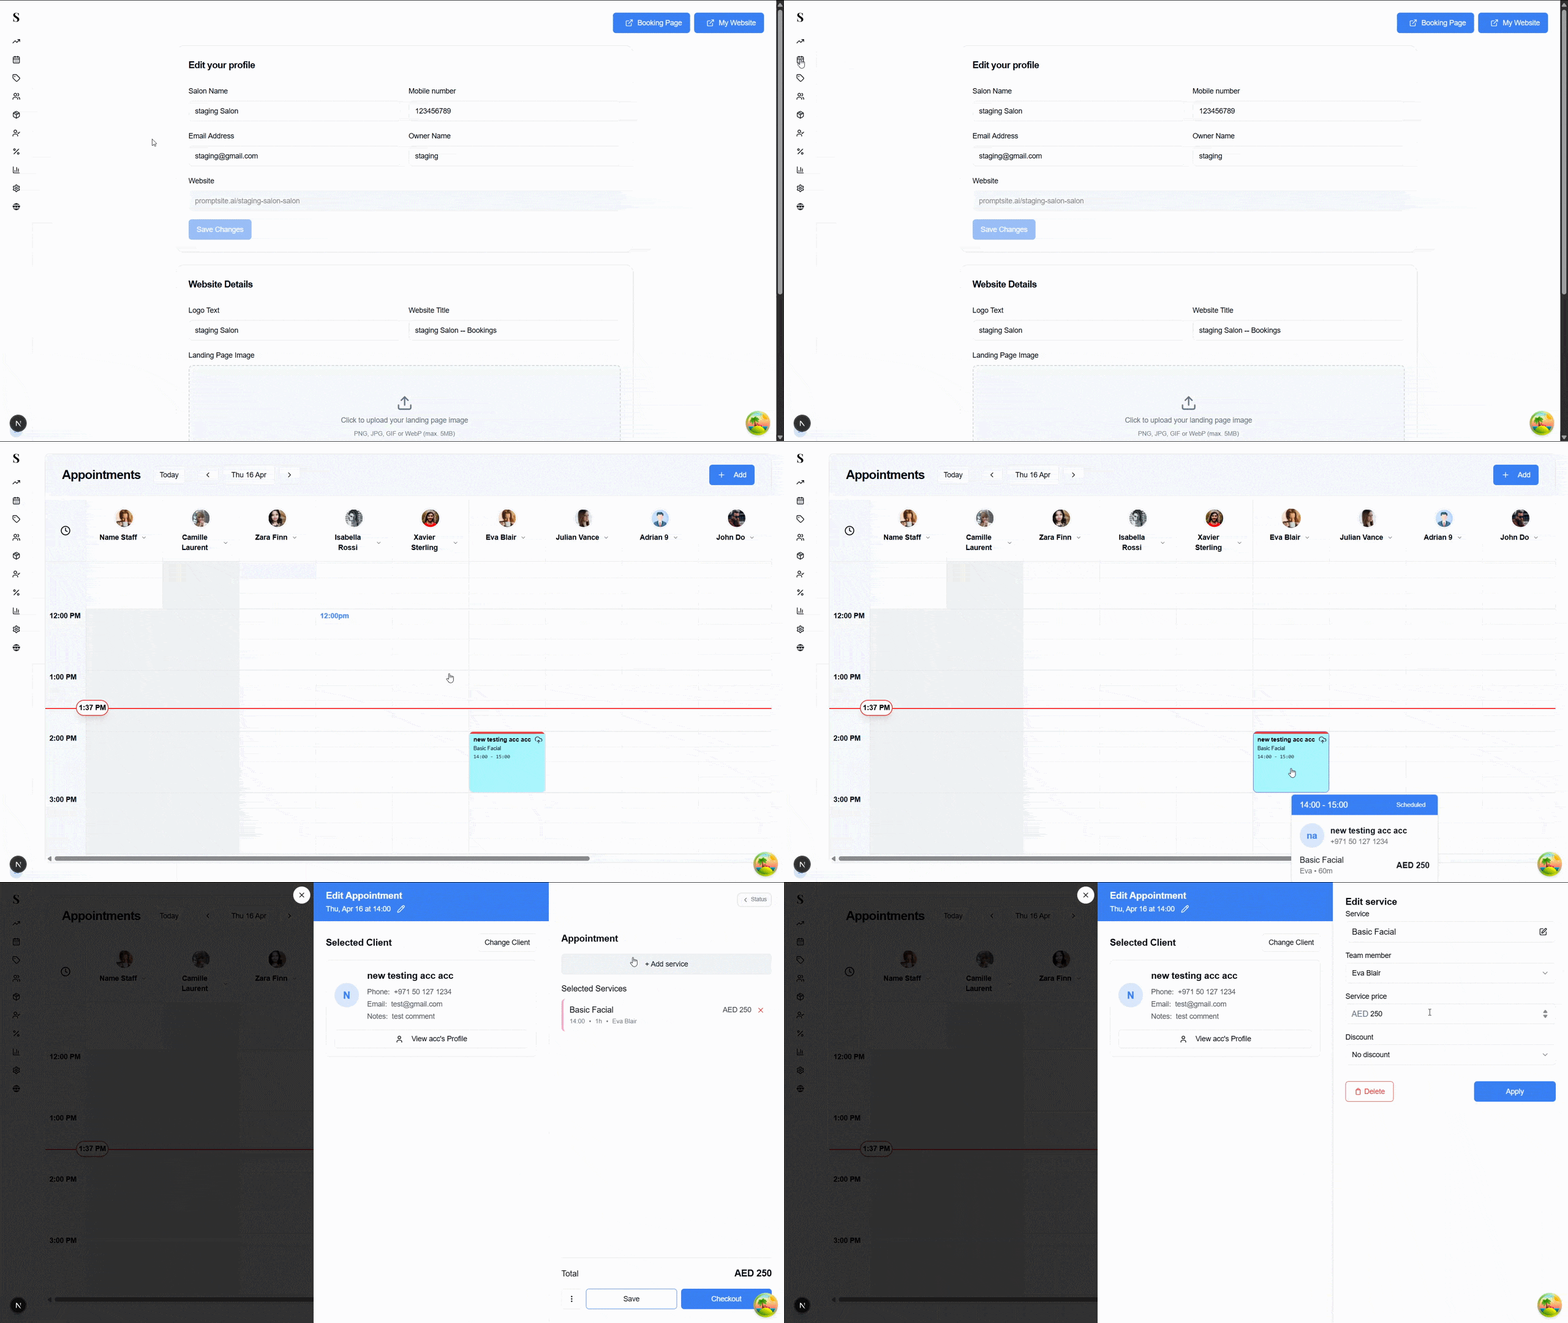
The appointment is instantly added to your Calendar in NxCut and visible to the assigned staff member.
Online Services
You can control exactly which services appear on your public booking page. For detailed instructions, see the Online Services page.