Checkout
Collect payment, print receipts, split bills, and manage completed sales
Checkout is how you collect payment after a client's visit. The whole process happens in a panel that slides in from the right — no page navigation needed.
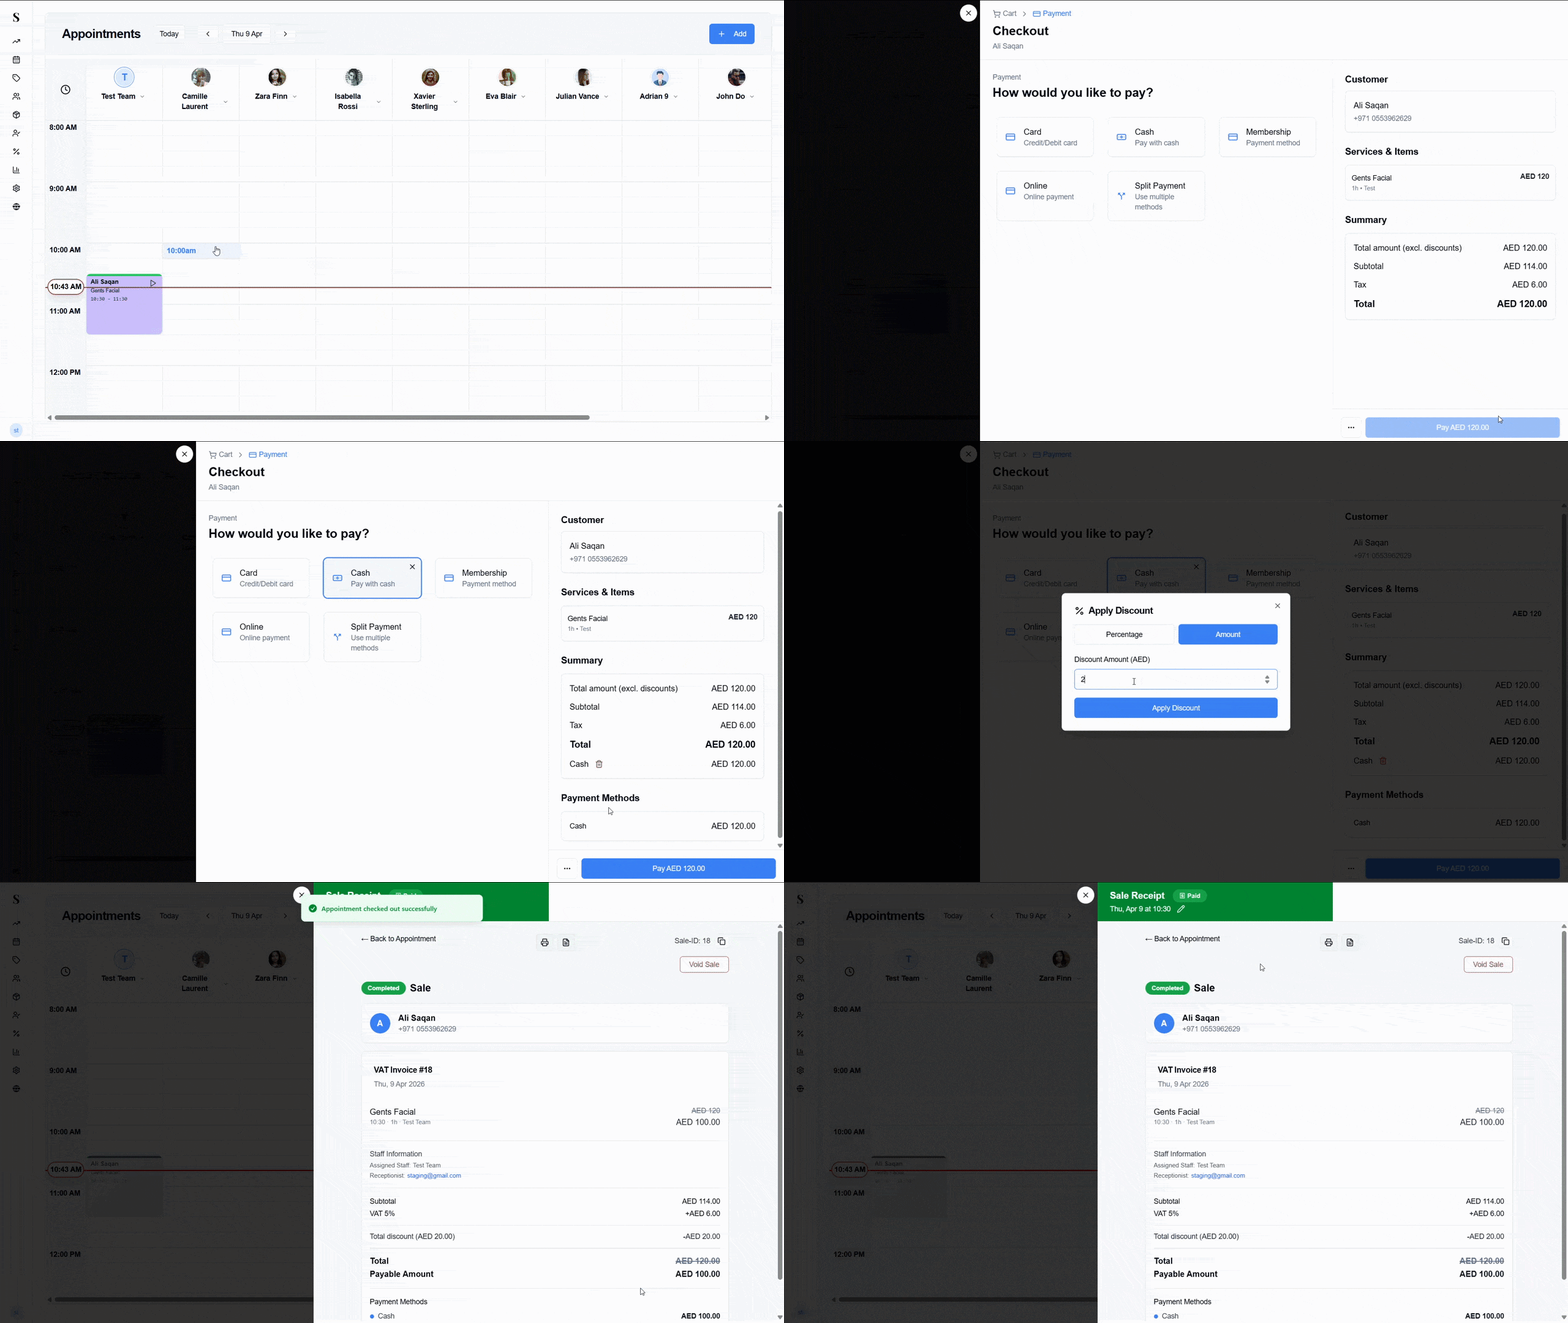
Starting a checkout
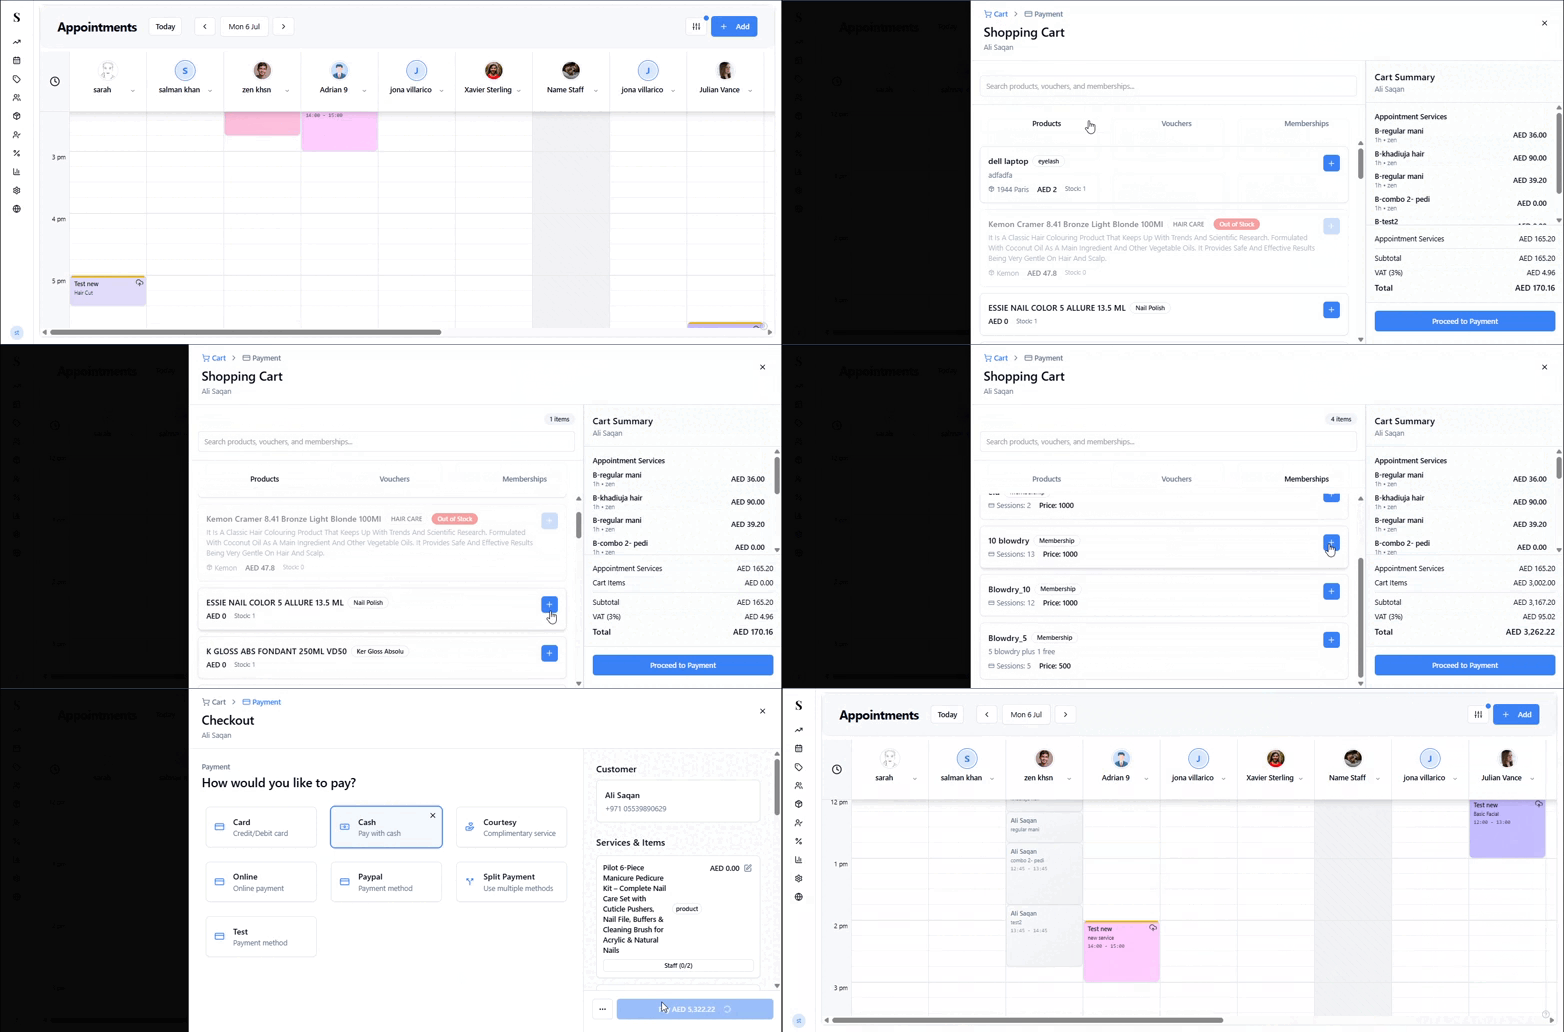
On the Calendar, click on the appointment card you want to check out.
In the Edit Appointment panel that opens, click the Checkout button at the bottom right.
The checkout screen slides in from the right, showing the client's name and the services from the appointment already loaded.
The checkout screen
The checkout screen is split into two areas:
Left — Payment Choose how the client is paying. The available options are shown as cards:
| Option | Description |
|---|---|
| Card | Credit or debit card |
| Cash | Pay with cash |
| Membership | Redeem a pre-paid session from the client's membership |
| Online | Online payment |
| Split / Partial Payment | Divide the bill across multiple payment methods or take partial payment |
Click the option that applies. The selected method will be highlighted.
Right — Order summary Shows the client's name and phone number, the services being charged, and a full summary:
- Total amount (excluding discounts)
- Subtotal (after any discount)
- VAT (5%)
- Total due (including any added tips)
- The chosen payment method and amount
Picking the Sale Date: If you're paying for an appointment whose date is different from today, a dialog asks "Use today's date, or the appointment date?" with two options — Use Current Time (Recommended) or Use Appointment Date ([date]). Pick the appointment date to backdate the sale so it lands in the correct day's reports; pick current time for a normal same-day sale.
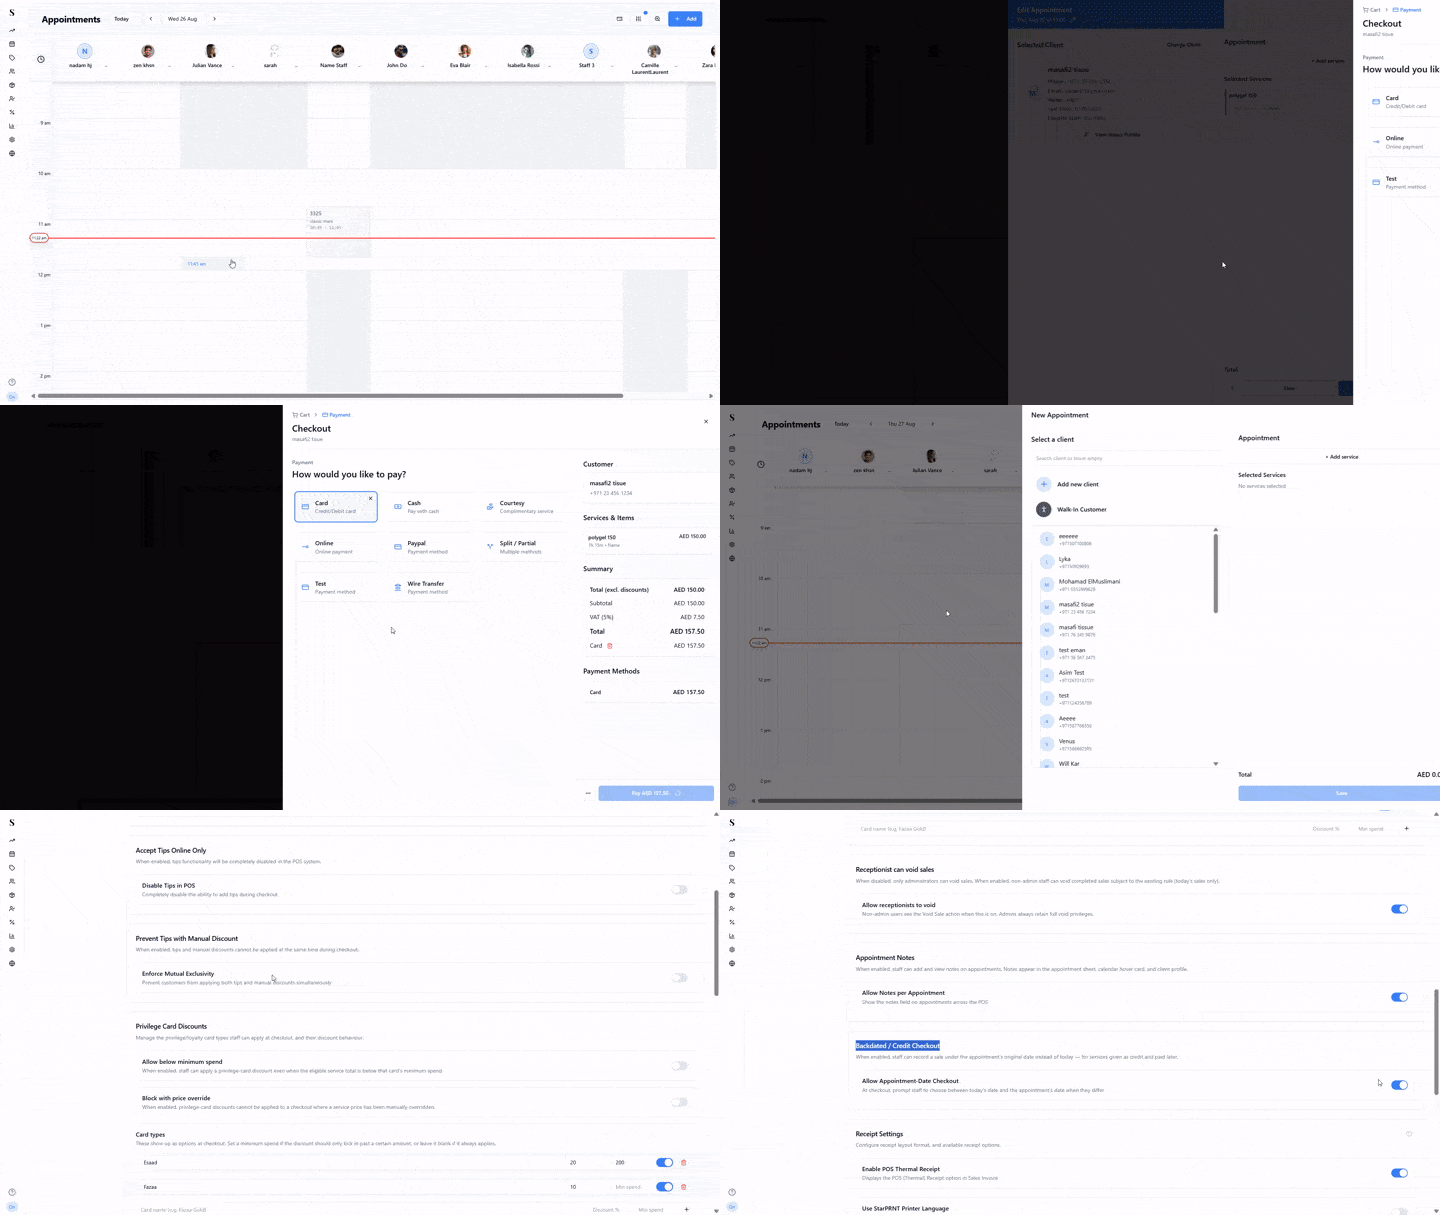
Whether this dialog appears is controlled by the Backdated / Credit Checkout store permission — see Store Permissions.
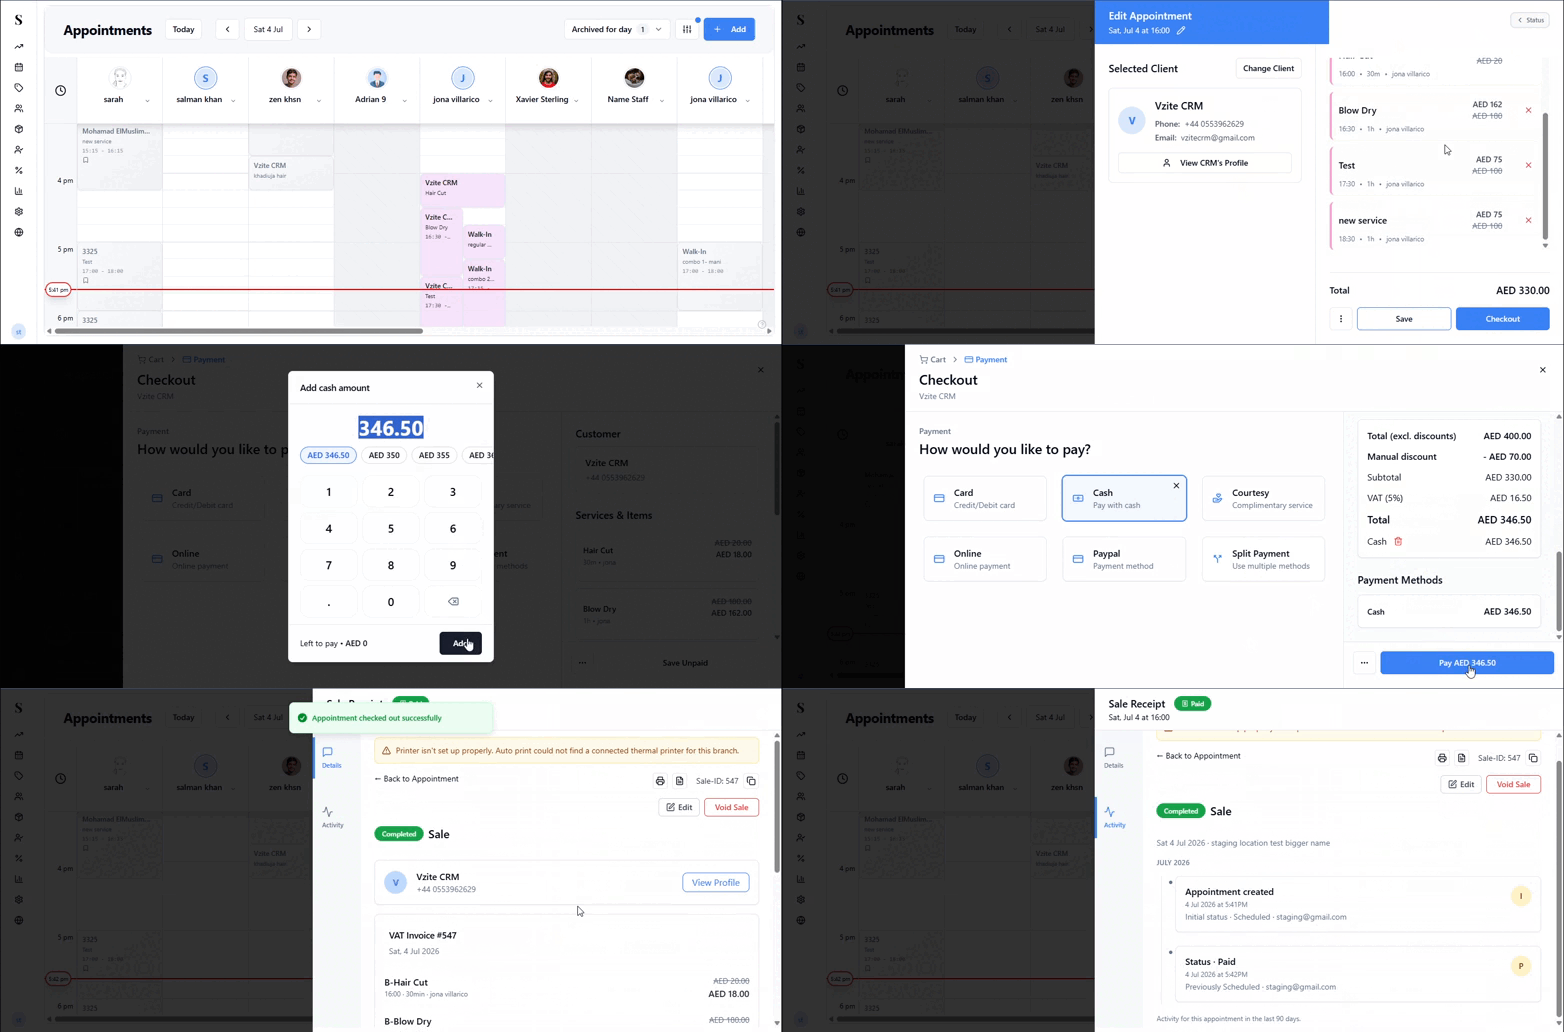
Checking out with a Membership
If the client has an active membership with pre-paid sessions, select Membership as the payment method to redeem a session instead of taking a card or cash payment.
On the checkout screen, click the Membership payment card.
The client's active membership is matched automatically and a covered session is redeemed against the service(s) in the cart.
Any items not covered by the membership (extra products, add-on services) are still charged through the client's chosen payment method.
Checking out with a Voucher
Clients with a voucher on their profile can pay with it directly from the checkout screen, without needing the voucher code.
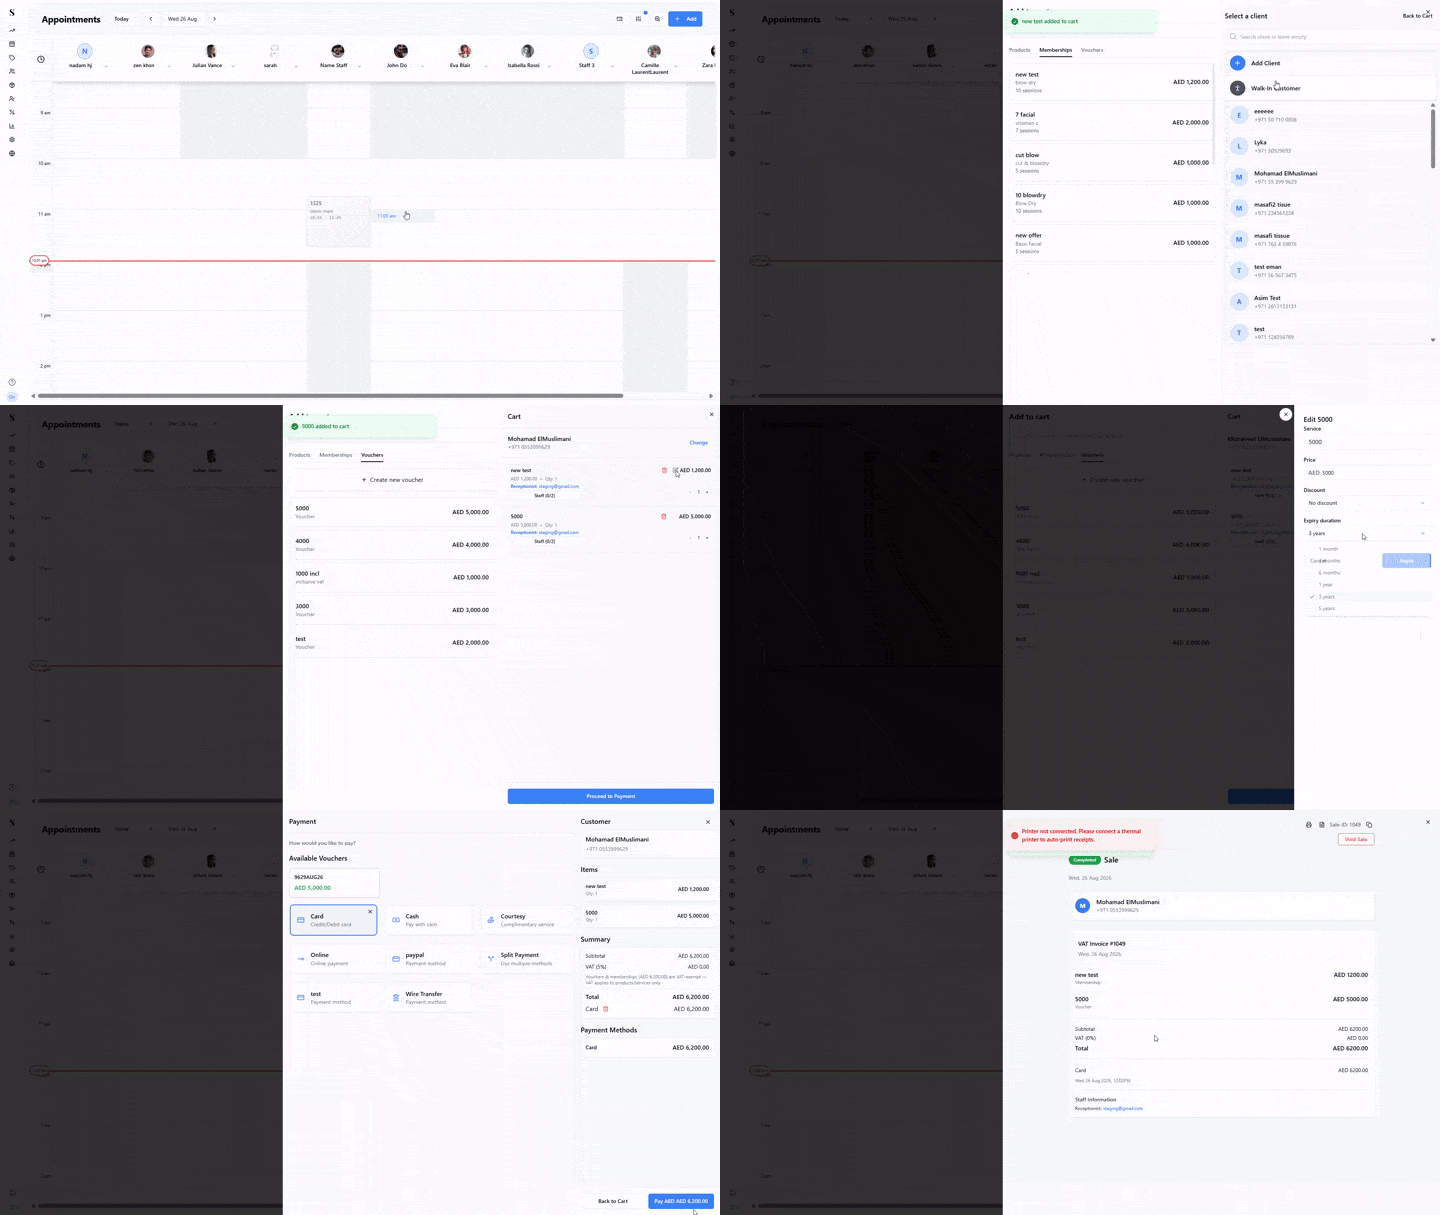
On the checkout screen, the client's available vouchers are shown above the payment method cards. Click the voucher you want to use.
Confirm by selecting the correct voucher again.
Set how much of the voucher's value to apply — enter an amount, or click Max to use the full voucher balance or just enough to bring the bill to zero.
Complete checkout as usual. Any remaining balance after the voucher is applied is collected through the client's chosen payment method.
Multi-Staff Service Checkout
When a service was performed by multiple team members (for example, one specialist applied the color and another did the blow dry), all assigned staff members appear on the checkout item.
Checkout automatically sorts staff by the amount of time they worked on the service. This ensures transparent, accurate commission attribution and fair tip allocation.
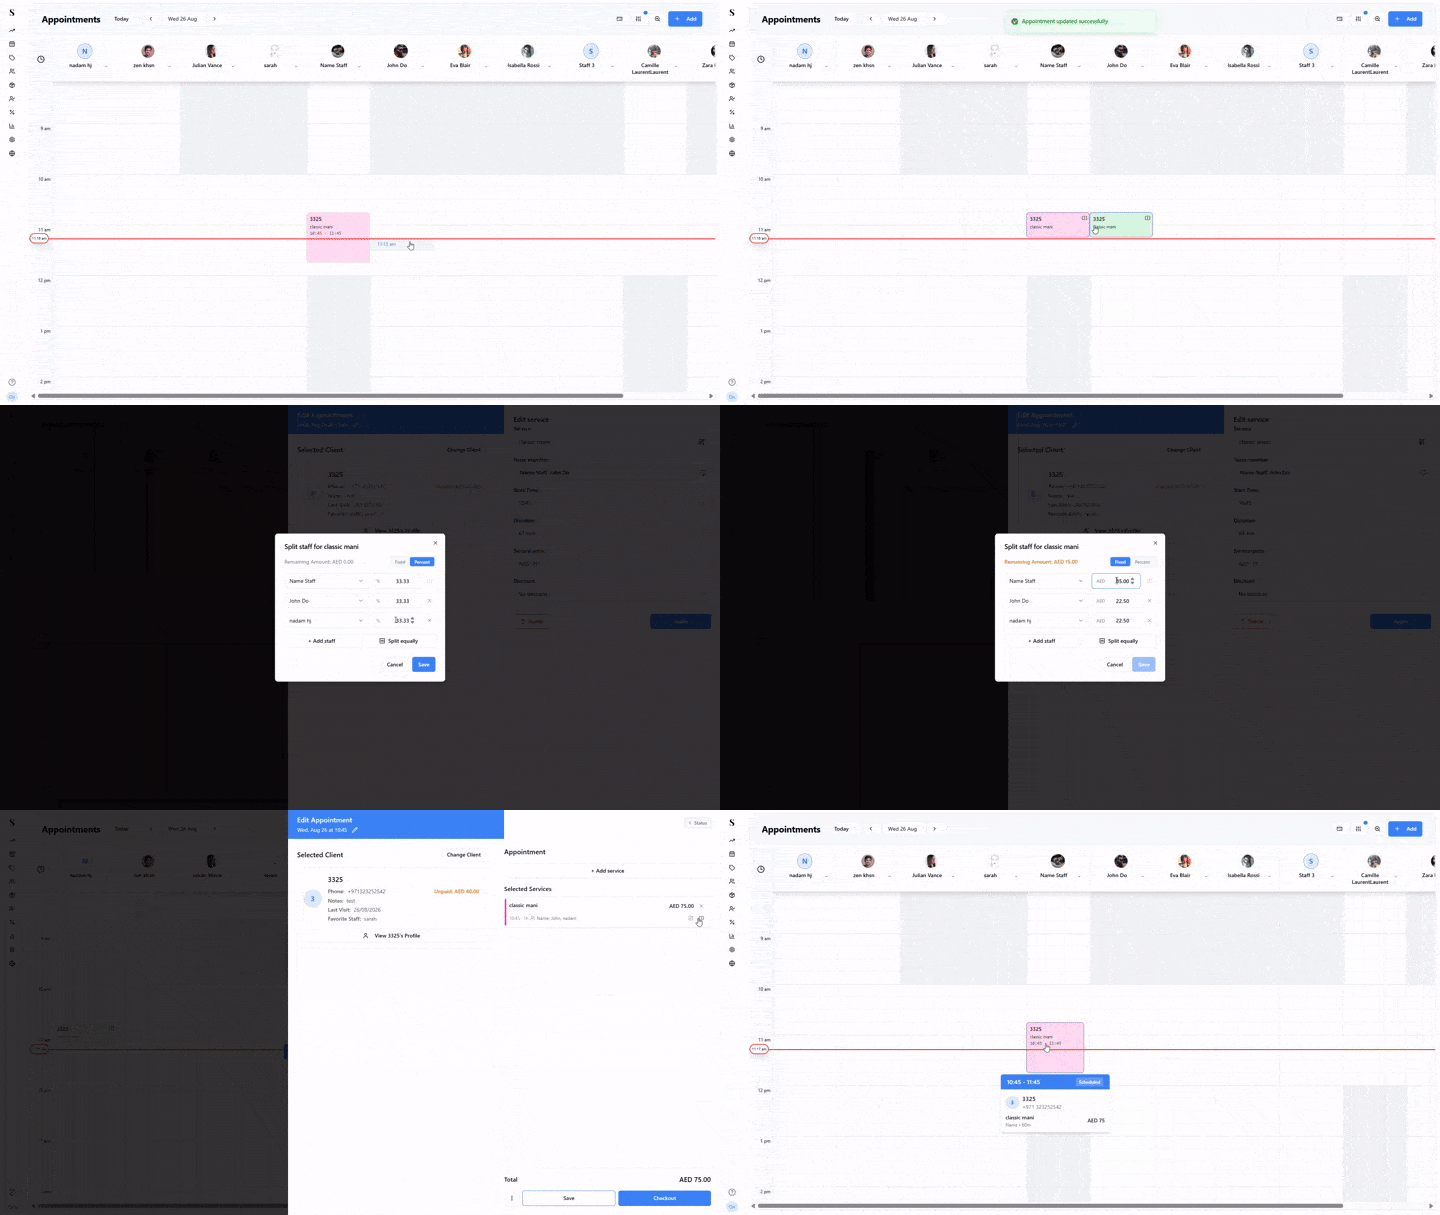
Click a multi-staff item in the cart to open the Split staff dialog and control exactly how the service is divided:
- Toggle between Fixed and Percent to split by a fixed amount or by percentage.
- Each assigned staff member gets their own row with an editable share (e.g. three staff each at 33.33%).
- Click + Add staff to include another team member in the split.
- Check Split equally to divide the remaining amount evenly across everyone in one click.
- The Remaining Amount updates live so you can confirm the split accounts for the full total before clicking Save.
Managing cart items
The services and products loaded into the checkout are displayed as cart items on the right. You can manage them before finalising the sale:
- Select an item — click on any cart item to highlight it. This lets you apply discounts or remove individual items without affecting the rest of the order.
- Add more items — you can add products, services, memberships, or vouchers to the cart even after opening checkout.
- Remove an item — select an item and click the remove option to take it off the bill.
- Change quantity — for products, you can adjust the quantity up or down.
You are not limited to what was on the appointment. If the client decides to buy a retail product or add another treatment at the counter, you can add it directly in checkout.
Applying discounts, tips, and vouchers
At the bottom left of the checkout screen, click the ··· (three dots) button to reveal additional options:
| Option | What it does |
|---|---|
| Apply Discount | Add a fixed amount, percentage discount, or tap the quick 50% preset button |
| Add Tip | Add a gratuity for the staff team |
| Split / Partial Payment | Divide the total across multiple payment methods or accept partial deposits |
| Apply Voucher | Redeem a gift voucher code to reduce the balance |
Privilege & VIP Card Discounts
If the client holds an active Privilege Card (such as VIP, Gold, or Corporate tier), their pre-configured discount is applied automatically as soon as their profile is attached to checkout. Privilege discounts work seamlessly alongside manual price overrides without conflicts.
Voucher & Membership Rules at Checkout
- Payment Required Before Activation: Vouchers and memberships must be fully paid for at checkout before any included sessions can be redeemed.
- Expired Voucher Guard: If a client presents an expired voucher, checkout clearly flags it and blocks redemption to protect against unearned discounts.
- Expiry Duration at Point of Sale: Click a membership or voucher line in the cart to open its Edit panel — you can set or override the Expiry duration (e.g. 6 months) right there, in addition to the price and any discount, without needing to change the preset back in the Catalog.
- VAT Exemption Note: The payment summary flags vouchers and memberships as VAT exempt (e.g. "Vouchers & memberships are VAT exempt. VAT applies to products/services only"), so the VAT line only reflects taxable items in the cart.
Advanced Split & Partial Payments
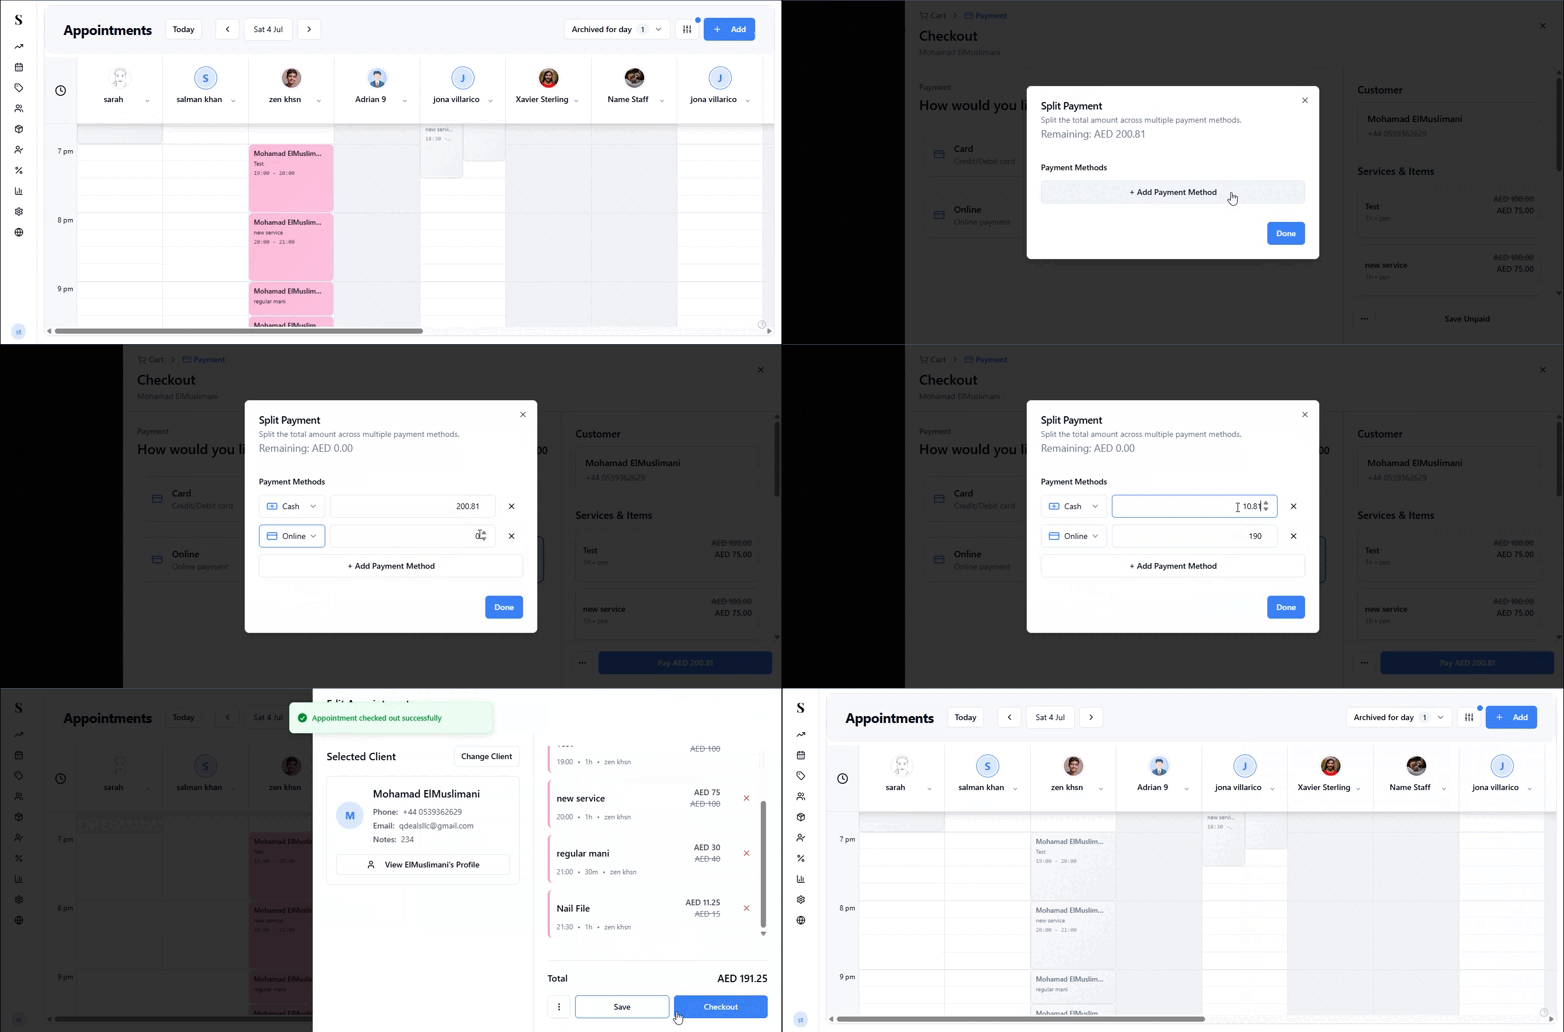
Split / Partial Payment lets a client pay using more than one method — for example, part cash and part card, or splitting a bill between two cards. It also lets you collect partial payments on an open balance.
On the checkout screen, click the Split / Partial Payment card, or open the ··· menu and choose Split Payment.
A dialog opens showing the total amount due at the top and a list of payment methods below.
Click + Add Split to add a payment line. Choose the payment method (Card, Cash, Voucher, etc.) and enter the amount for that portion.
You can use the same payment method more than once (e.g. paying with two separate cards). Already-used options are clearly indicated so you do not select them by mistake.
Add as many splits as you need. The remaining balance updates automatically.
Click Confirm to apply the split.
Taking Partial Payments & Balance Settlements
You can collect partial payments more than once on the same transaction. When the client returns later to pay their remaining balance:
- The checkout loads the remaining unpaid amount.
- Collecting the final payment preserves the original payment date for the first deposit, ensuring your daily sales and accounting reports for both days stay 100% accurate.
If the split payments add up to less than the total, the remaining balance is shown clearly. If a split exceeds the total, you will see an overpayment alert — adjust the amounts so they match the total due.
Split payment example
A client's total is AED 300. They want to:
- Pay AED 150 by card
- Use a AED 100 voucher
- Pay the remaining AED 50 in cash
Just add three splits — one for each method with the correct amount. The system tracks it all and prints each payment method on the receipt.
Completing the payment
Once you have selected the payment method and applied any discounts or tips, click the Pay AED [amount] button at the bottom right to finalise the sale.
Sale receipt & auto-printing
After payment is confirmed, the Sale Receipt screen appears with a green Paid badge.
- Auto-Printing on Quick Sales: If you are using the NxCut Print Bridge, sales made through the quick sale cart (products, memberships, vouchers) print automatically upon completion — no manual print button required.
- Thermal Receipt (80mm): Formatted specifically for POS thermal receipt printers.
- Standard Invoice (A4): Full tax invoice formatted for standard office printers or PDF sharing.
View the client's profile
From the sale receipt screen you can navigate directly to the client's full profile to see their updated visit history, memberships, and vouchers.
Void a sale
If a mistake was made, click the Void Sale button (shown in red on the receipt screen). This cancels the transaction and reverses the sale record.
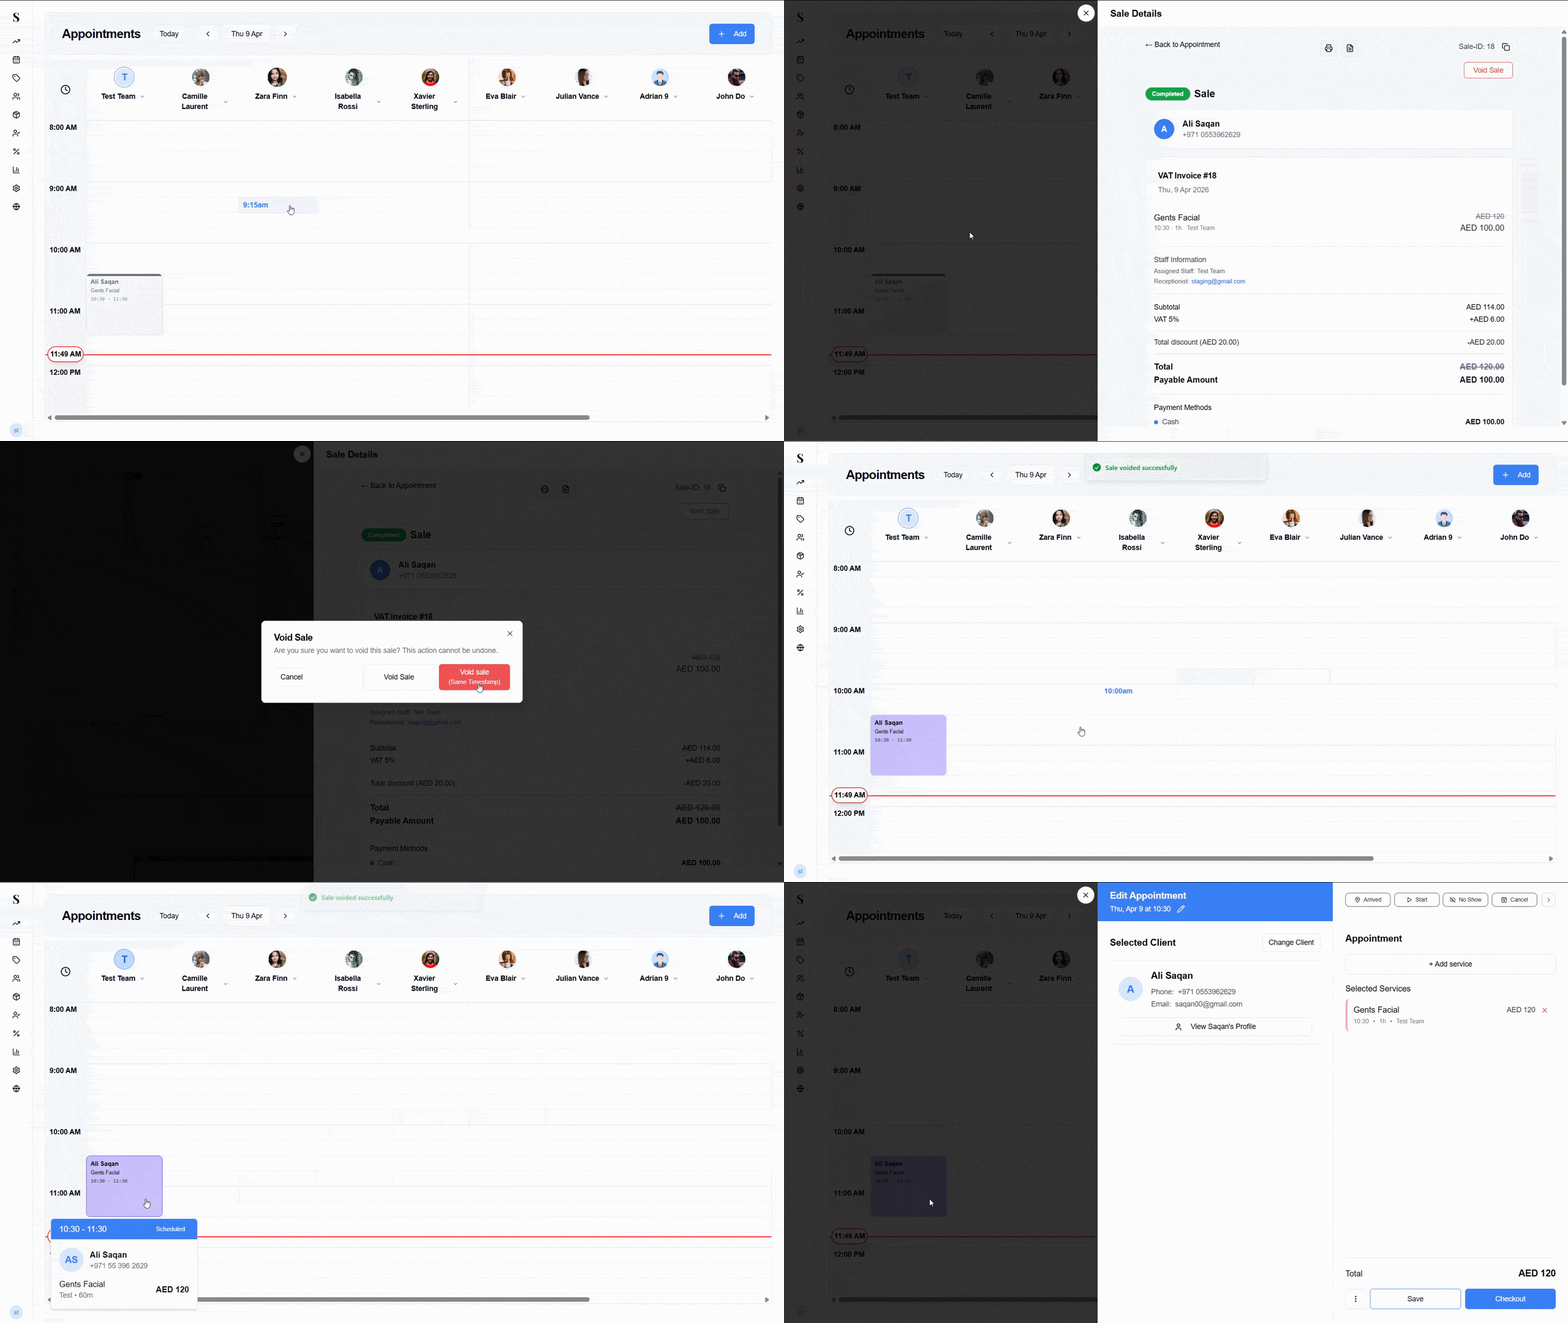
Voiding a sale cannot be undone. Only void a sale if you are certain there was an error — for example, the wrong client was charged or the wrong services were added.
Checkout summary
| Step | What happens |
|---|---|
| Click Checkout on the appointment | Checkout panel slides in with services and assigned staff pre-loaded |
| Select and manage cart items | Edit items, adjust quantities, or add retail products and extra treatments |
| Pick sale date (optional) | Adjust the sale date directly on screen if logging past transactions |
| Automatic VIP discount | Privilege card holders receive their tier discount automatically |
| Apply extras via ··· menu | Add tips, apply fixed/percentage/50% discounts, or redeem vouchers |
| Use Split / Partial Payment | Divide across multiple tenders or accept deposits |
| Click Pay | Sale is recorded, receipts auto-print (via Print Bridge), and receipt screen appears |
| Void Sale | Reverses the transaction if a mistake was made |