Calendar & Bookings
Book, view, and manage all your salon appointments in one place
The Calendar is where all your appointments live. It shows your team's full schedule side by side — one column per staff member — so you can see everyone's day at a glance and book new appointments in seconds.
How the Calendar is laid out
When you open the Calendar you will see:
- A column for each staff member — each person has their own lane with their profile photo and name at the top
- Time slots running down the page — the interval (15, 30, or 45 min) is set in Settings → Calendar
- A red line showing the current time — so you always know where you are in the day
- Appointment cards — each card shows the client name, service, and time range
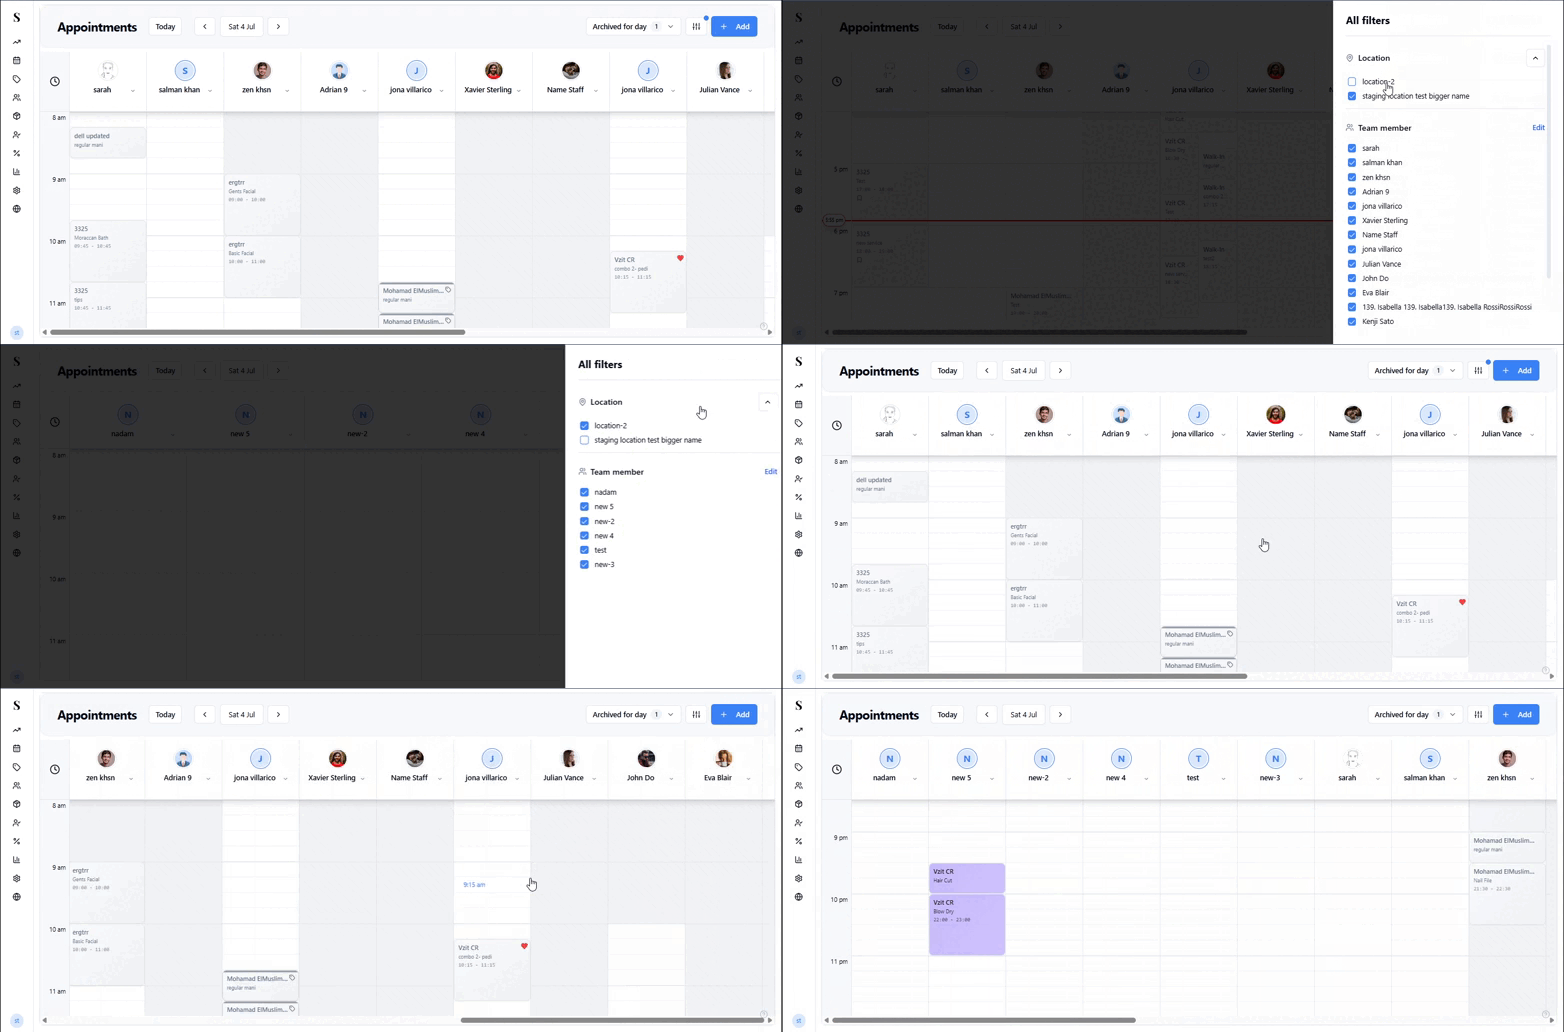
- A location filter at the top — switch between branches to see each location's calendar
- Navigation bar at the top — use Today, <, and > to move between days, or click the date to jump to a specific day
Navigating between dates
Use < and > to step one day at a time, Today to jump straight back to the current day, or click the date itself to open a date picker and jump to any day directly.
Text and calendar size adjustment
Click the magnifying glass icon in the top toolbar to open the Text Size panel and drag the Zoom slider to scale fonts, columns, and appointment cards across the Calendar — handy for touchscreen tablets or high-resolution POS terminals. See Settings → Appearance for details.
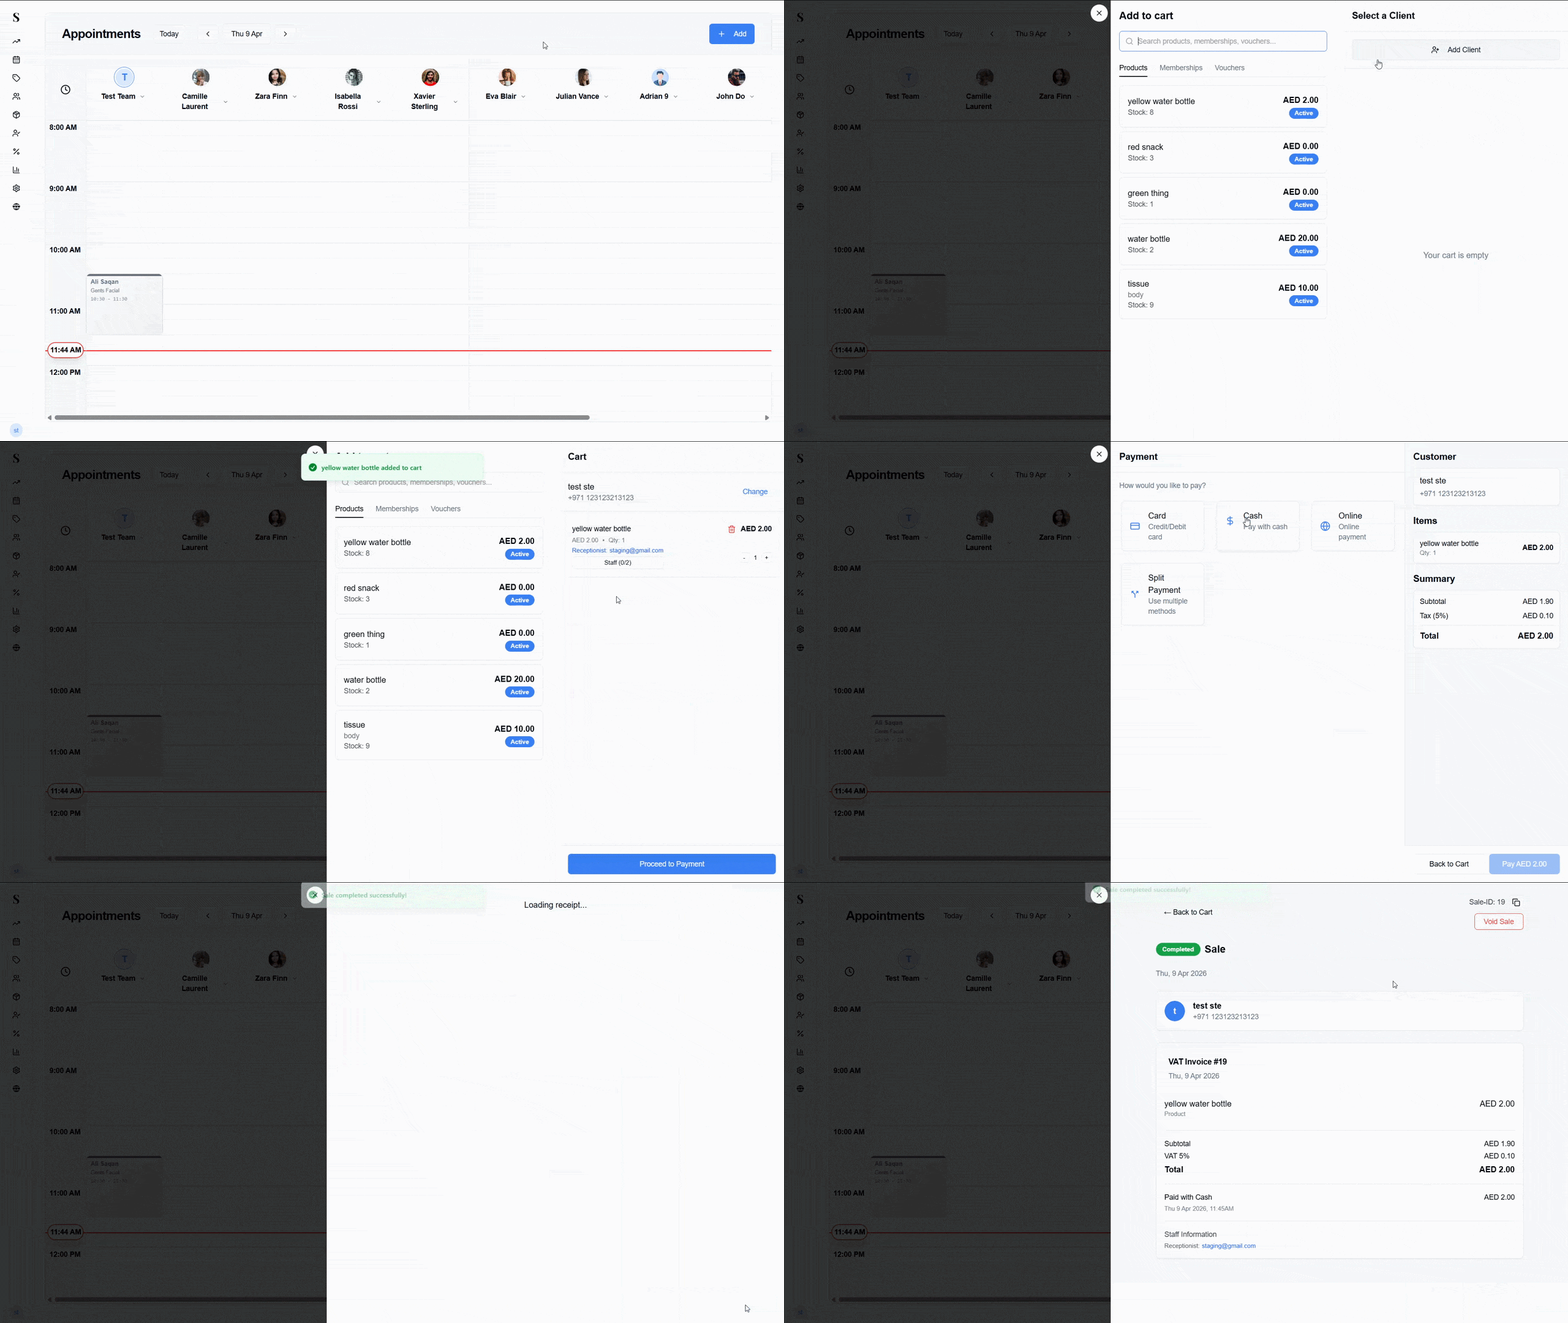
The + Add button in the top right corner is for selling products, memberships, or vouchers directly — it opens a cart where you select the items and a client. It is not for creating appointments. To book an appointment, click directly on an empty time slot in a staff column.
The Cart
Clicking + Add opens the cart — used for selling products, memberships, or vouchers without booking an appointment first.
Barcode scanning for items
Click Scan Mode at the top of the cart to switch the search bar into a barcode scanner. Scan any product's barcode and it's added to the cart automatically — no need to search by name. Scan Mode works the same way in both the quick sale cart and the appointment checkout cart.
Expiry for memberships and vouchers, and VAT exemption
Memberships and vouchers added to the cart carry their own expiry duration and are VAT exempt — see Voucher & Membership Rules at Checkout for how expiry and VAT exemption work at the point of sale.
Filtering by location & workspace switching
If your salon has multiple branches, you can switch between them using the Location Filter at the top of the Calendar.
Admin Multi-Location Tip: When creating or editing appointments at a specific branch, make sure you have switched your active workspace to that location. This ensures bookings, staff schedules, and reports stay perfectly synced with the correct branch.
Booking a new appointment
To create an appointment, click on any empty time slot in a staff member's column. A booking panel will slide open on the right side of the screen.
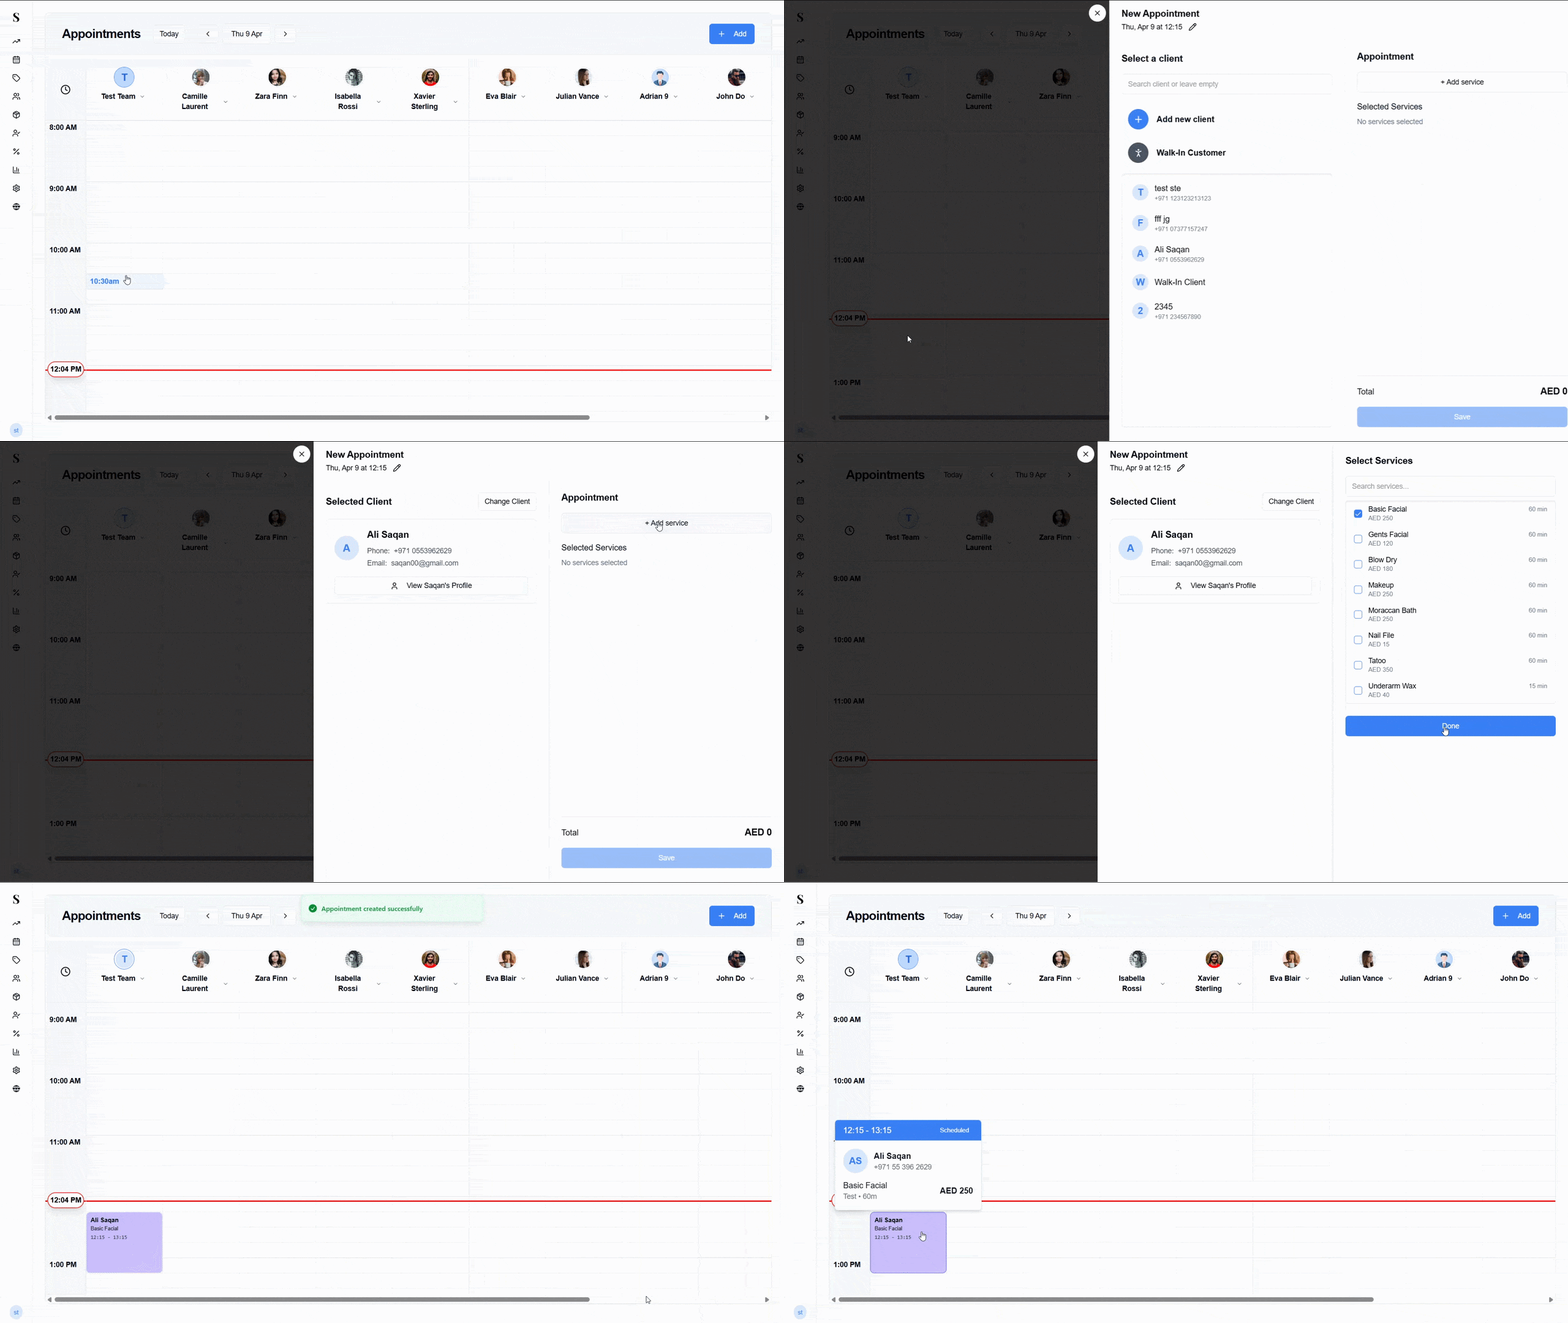
Step 1 — Select a client
The left side of the panel shows your client list. You can:
- Search by name or phone number
- Select an existing client from the list
- Choose Walk-In Customer if the client is not registered
- Click Add new client to create a new profile on the spot
Outstanding Balance Alert: If a client has an unpaid or part-paid balance from a previous visit, an Outstanding Balance badge appears right on their client card. Clicking it opens a list of their unpaid appointments.
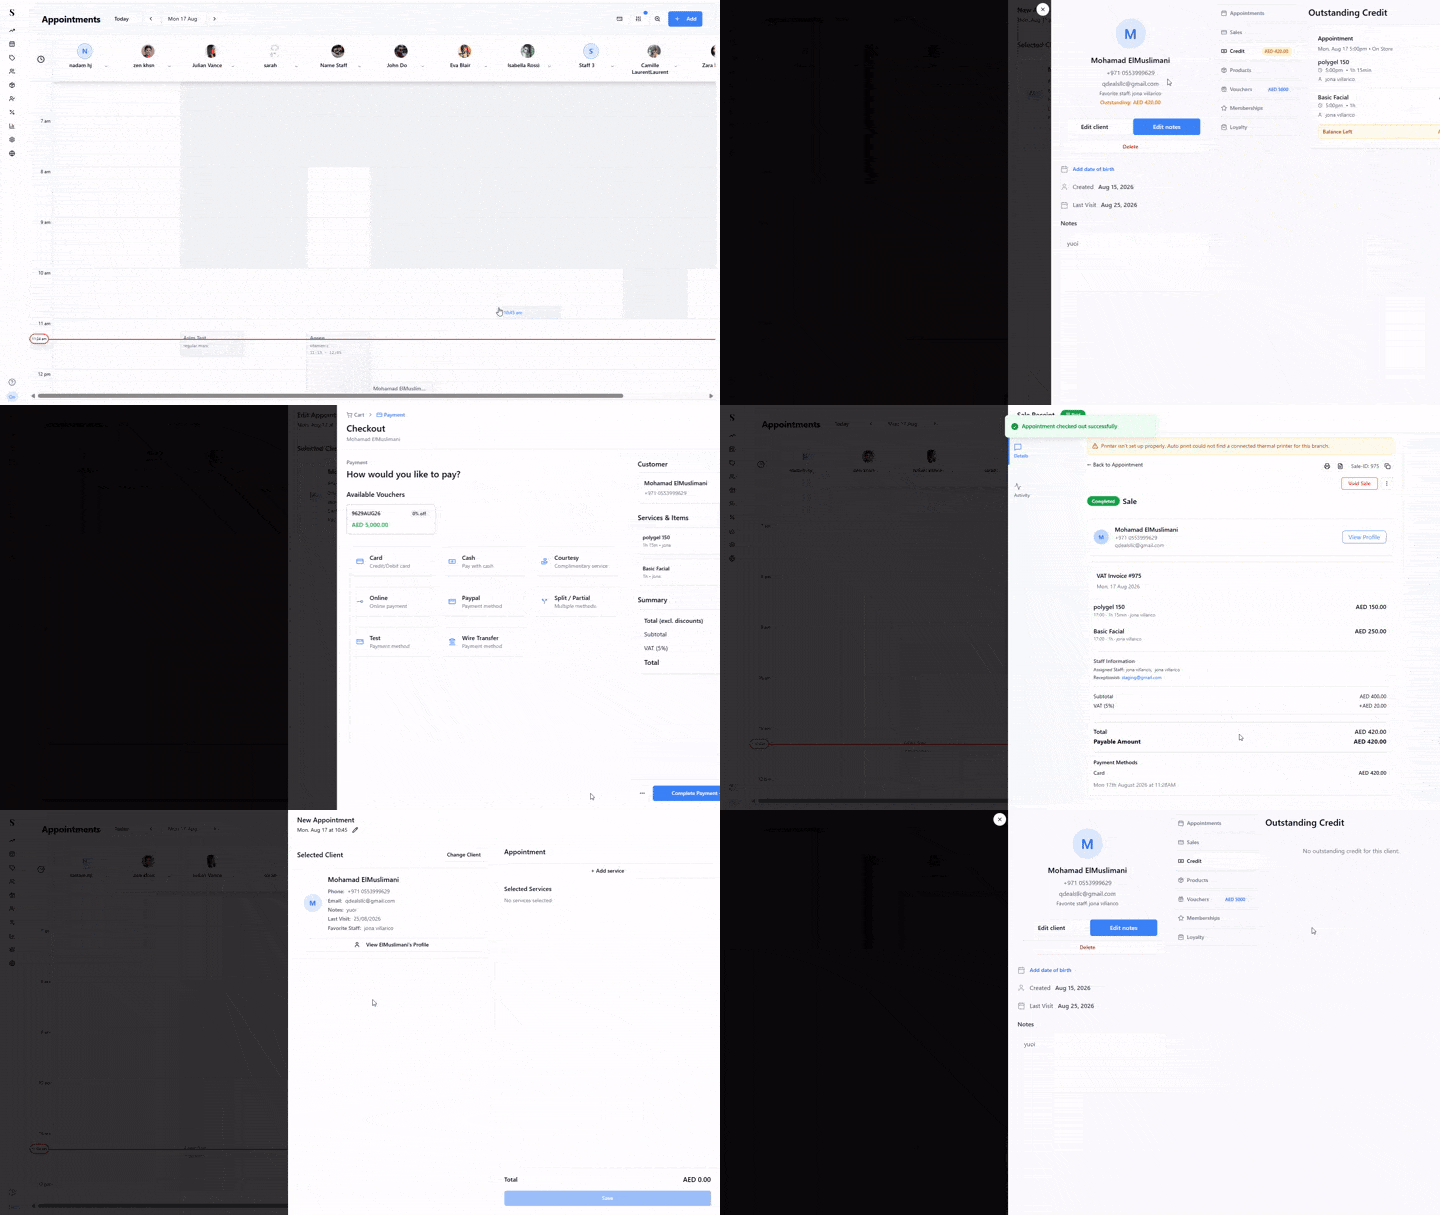
Once you select a client, their name, phone, and email will be confirmed on screen. You can click Change Client if you need to swap to someone else, or View [Client]'s Profile to open their full history.
Step 2 — Add services & assign staff
On the right side of the panel, click + Add service. A service picker will open showing all your available services with their price and duration.
- Tick the checkbox next to any service you want to add.
- You can select multiple services at once.
- Skill Tags & Specialization Matching: Stylists with relevant skill tags (such as Color Expert or Extensions Specialist) are highlighted, making it easy to match the client's service request to the right professional.
- Services show with their assigned color dot in this picker — see How to set the order and color of services below.
- Click Done when finished.
The selected services appear in the Appointment panel showing the time, duration, assigned team, and price.
Staff Split Delegation
A single service can be split across up to 6 team members — useful when more than one stylist contributes to the same service. Click the split icon on a selected service to open Split staff for [service]:
- Toggle between Fixed and Percent to divide by amount or by percentage.
- Click + Add staff to bring in another team member, up to 6 total.
- The split automatically divides the service's time, commission, and bill between the assigned staff according to their share.
Edit panel — editing a service
Click the edit icon on any selected service to open the Edit service panel, where you can change the assigned team member, start time, duration, service price, or apply a discount, or remove the service entirely with Delete.
Bundles
Bundles let you add a pre-configured group of services in one click. See Service Bundles for how to create and edit them.
Staff Restrict Alert
Services can be restricted to specific staff in Catalog → Services. If a receptionist tries to book a restricted service for a staff member it isn't assigned to, team members without that service show a small amber warning icon next to their name in the team member dropdown:
Depending on the restriction level set for that service:
- Warn — an amber alert is shown but the booking can still proceed.
- Strict — the booking is blocked until a properly assigned staff member is selected.
How to set the order and color of services
Service order and category color are configured in Catalog → Services. The order and color you set there is reflected everywhere services are shown or selected, in this priority: Bundles → Membership-included services → Service order.
Client Service to Team Member heart
You can mark a staff member as a client's preferred stylist for a specific service. Open the Edit service panel on a selected service and click the heart icon next to the team member field — this favorites that staff member for the service, separate from the report-favoriting heart used in Reporting.
Home Service appointments
Toggle Home Service on in the booking panel to mark the appointment as performed at the client's home or another off-site location instead of in the salon.
Step 3 — Save
Click Save. The appointment is created instantly and appears as a card on the calendar.
Drag-and-drop appointment scheduling
Need to move a booking or swap stylists? You can use drag-and-drop right on the calendar:
- Click and hold any appointment card.
- Drag it up or down to change the time.
- Drag it sideways into another column to reassign it to a different staff member.
- Release to save. The appointment time and staff assignment update immediately.
Booking multiple appointments side by side
You can book more than one appointment in a single session — useful when a client wants to see different specialists at the same time, or when you are scheduling a group.
Book the first appointment as usual by clicking an empty slot and filling in the details.
Before clicking Save, click + Add Another Appointment at the bottom of the booking panel.
Choose a second staff member and time slot. Add the services for this appointment.
Repeat for as many appointments as needed.
Click Save All to create all appointments at once.
All appointments are saved together and appear side by side on the calendar. This is ideal for:
- A client getting a haircut and a manicure simultaneously from different staff
- Booking a bridal party where multiple people need appointments at the same time
- Scheduling follow-up appointments while booking the current one
Appointment card hover
Hover over any appointment card on the calendar to see a quick summary popup showing:
- The time range (e.g., 14:30 – 15:30)
- The current status badge (e.g., Scheduled)
- The client's name and phone number
- The service name, team, duration, and price
- Any appointment notes that have been added
Editing an appointment & visual timeline
Click on an existing appointment card to open the Edit Appointment panel. It works the same as the booking panel — you can change the client, add or remove services, or update the time or Status.
Status Action Buttons
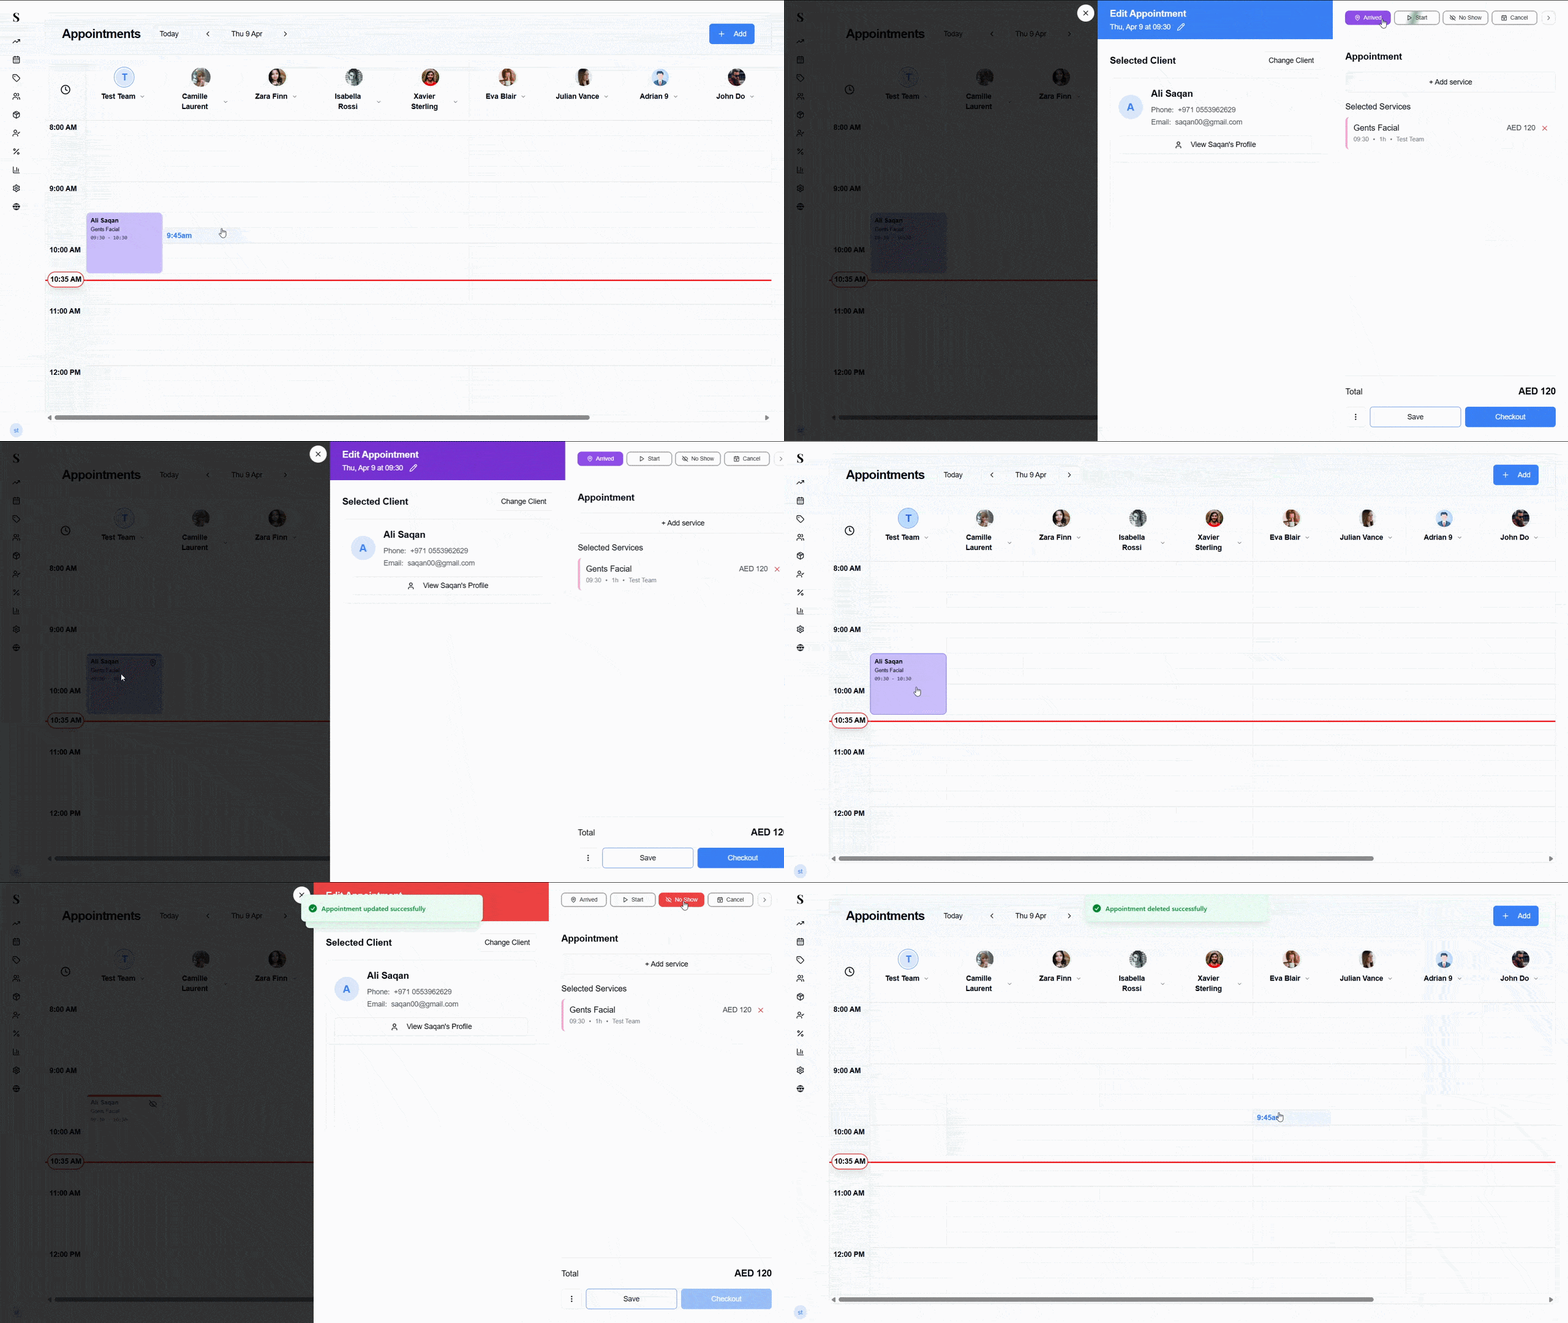
At the top of the edit panel you will see status action buttons:
| Button | What it does |
|---|---|
| Arrived | Marks the client as checked in and present in the salon |
| Start | Marks the service as actively in progress |
| No Show | Records that the client did not show up |
| Cancel | Cancels the appointment |
Visual Activity Timeline
Inside the appointment sheet, the Activity Timeline displays an icon-based visual history of everything that happened with the booking — when it was created, rescheduled, marked arrived, started, or checked out.
Appointment Notes
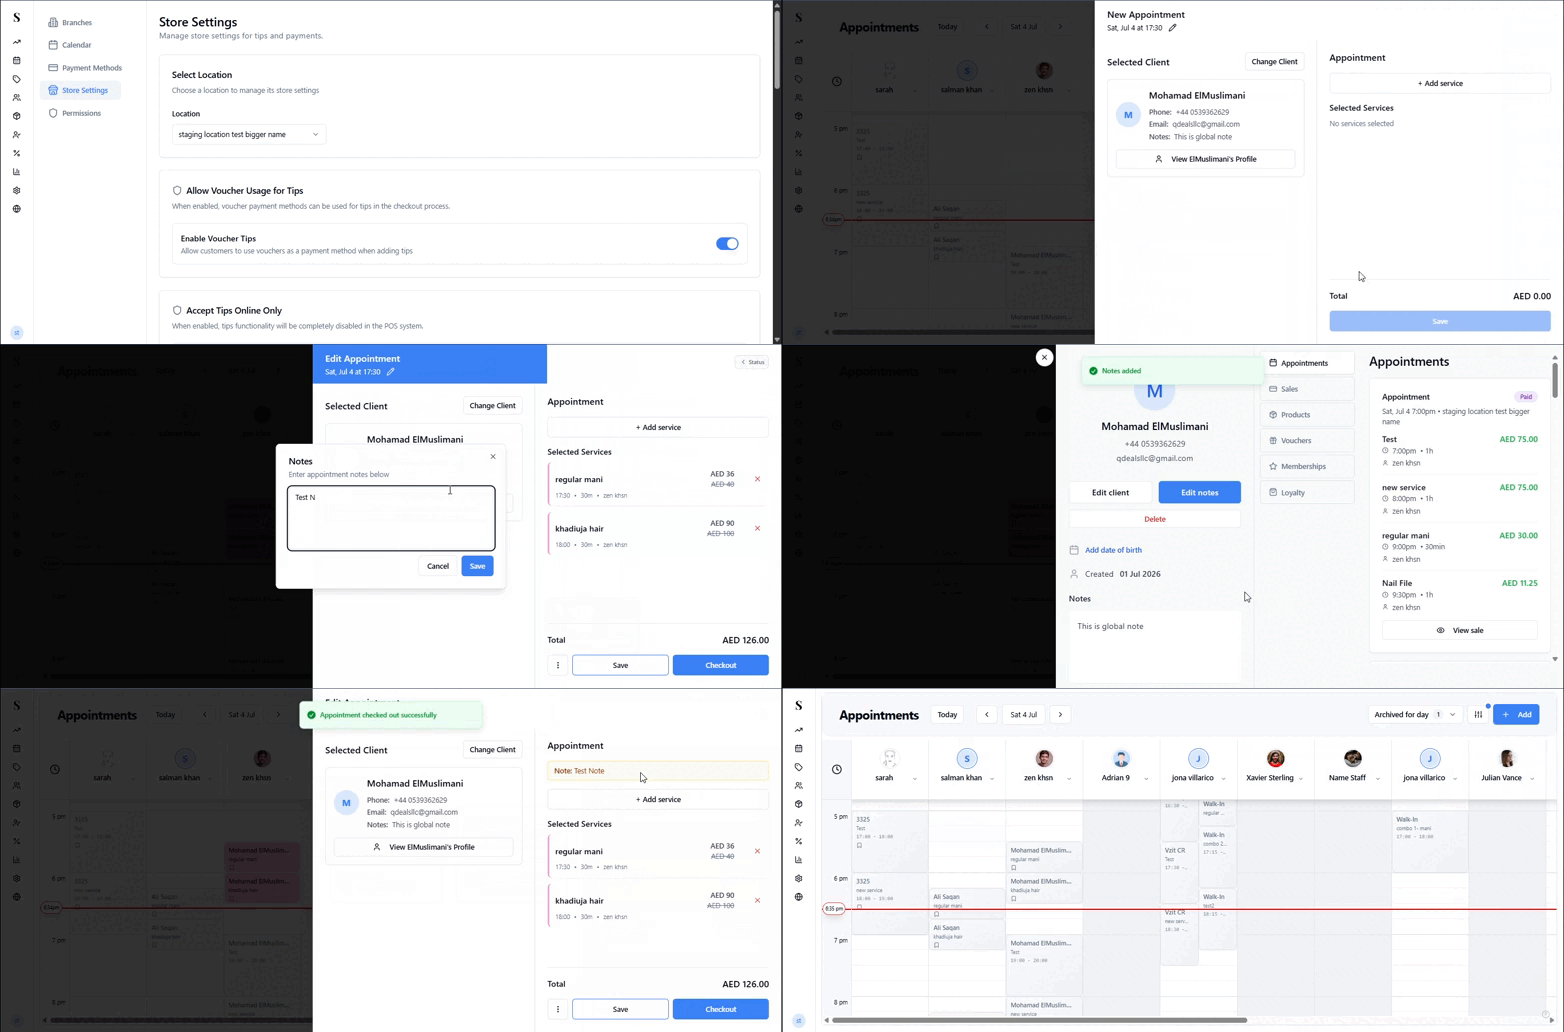
You can add notes to any appointment to share context with your team. Notes are visible wherever the appointment appears — on the calendar, in the hover popup, on the sale invoice, and on the client's profile.
Click on an appointment to open the Edit Appointment panel.
Find the Notes field and type your message — for example, "Client prefers unscented products" or "Birthday — offer complimentary upgrade."
Click Save.
Once saved, the note is shown:
- As a small note icon on the appointment card on the calendar
- In the hover popup when you hover over the card
- Inside the appointment panel
- On the printed sale invoice
- On the client's profile under their appointment history
If the Notes feature is not visible, an admin may need to enable it in Settings → Store Settings under Allow Notes per Appointment.
Staff breaks & coverage alerts
You can schedule staff breaks (such as lunch or rest breaks) on the calendar. If you attempt to book an appointment over a scheduled staff break, NxCut displays a coverage warning so you can reassign the booking or adjust the break time.
The staff column menu
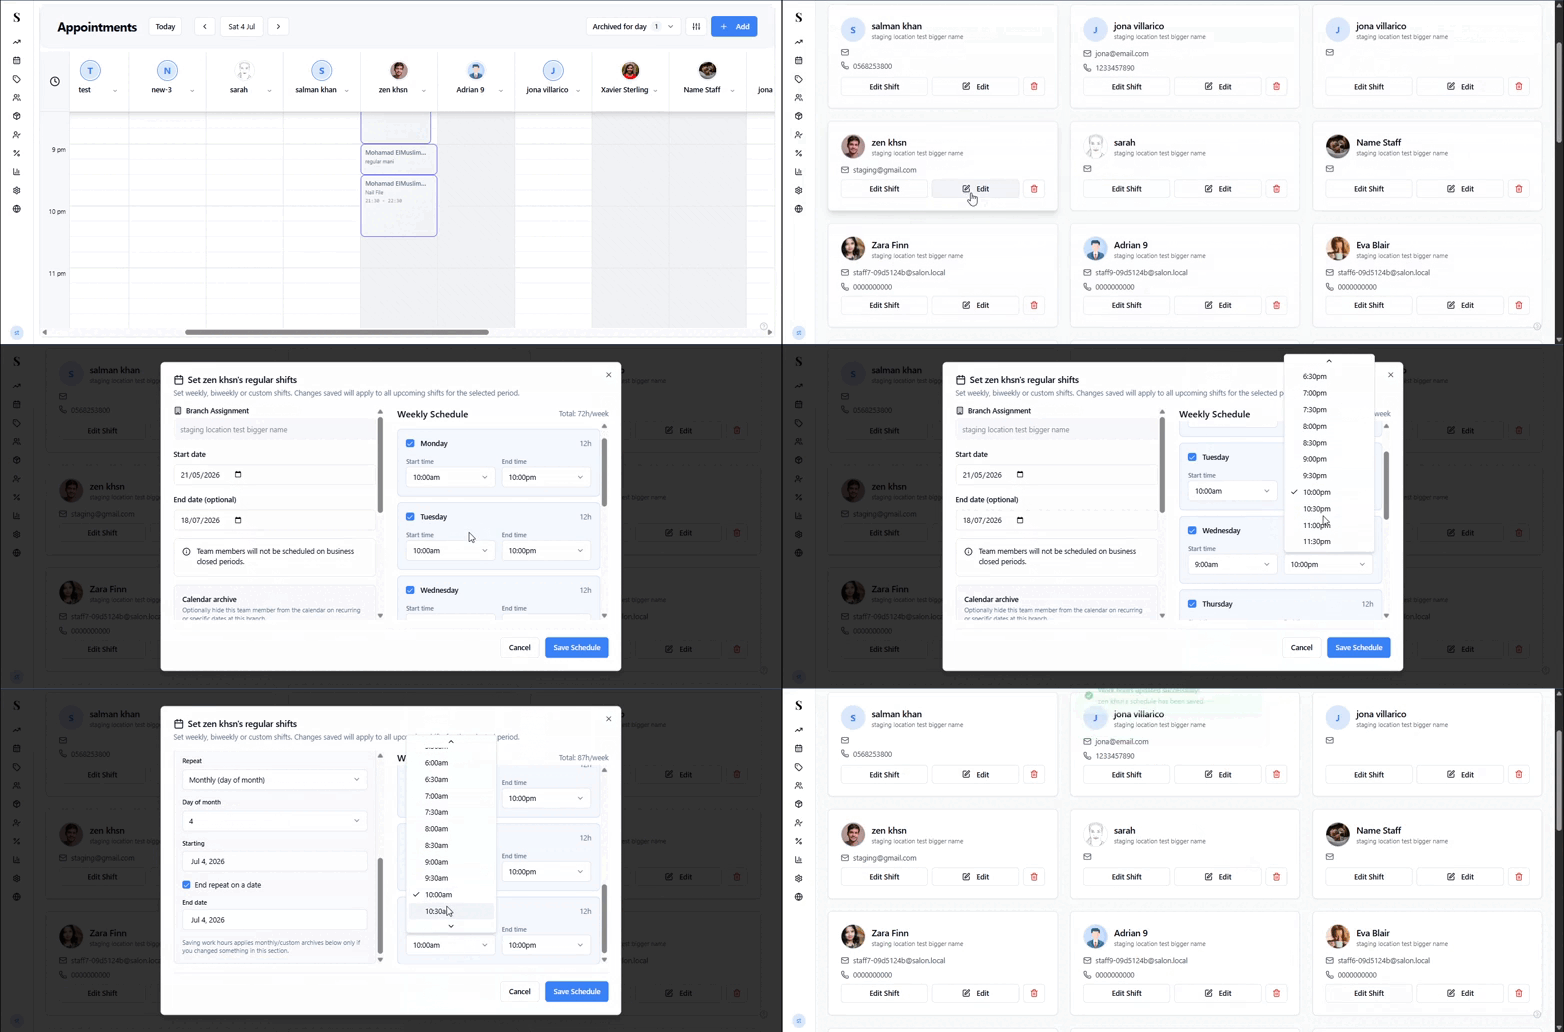
Clicking a staff member's name at the top of their column on the Calendar opens a menu for managing that staff member directly, without leaving the Calendar: Edit Shift, Archive, and reordering their column.
Day-by-day shift overrides & marking staff off
In addition to setting regular weekly schedules in Team Management, managers can adjust a staff member's working hours or mark them off for a single day directly from the Calendar column header.
Click on the staff member's name at the top of their column on the Calendar.
Choose Edit Shift from the menu that appears. A dialog opens titled "[Staff Name]'s shift, [Day], [Date]", with a note that you are editing this day's shift only (a link is provided to jump to scheduled shifts if you want to change their recurring weekly hours instead).
Adjust the start time and end time for that single day, or click the trash icon to remove the shift and mark them off entirely.
Click + Add shift if the staff member is working a split shift (e.g. morning and evening) — this adds a second start/end time range for the same day.
The total shift duration for the day updates automatically as you adjust times. Click Save when done — the change applies only to that single day, and their recurring weekly schedule remains untouched.
Use this when someone is covering an emergency shift, coming in an hour late, working a split shift, or taking an unexpected day off.
Archiving a staff member from the Calendar
The same menu you use for Edit Shift also has an Archive option, so you can retire a staff member without leaving the Calendar. It archives them the same way as Archive on their card in Team Management — their column is removed from the Calendar but all past appointments and sales stay intact.
Reordering staff columns
Open the staff name menu at the top of a column and use the left/right arrow icons to move that staff member's column earlier or later among the others — handy for keeping your busiest stylists' columns together or matching the physical layout of your salon.
Blocking time off
Need to mark a staff member as unavailable for a salon meeting, lunch, training, or maintenance? You can block out time without creating an appointment.
Click on an empty time slot in a staff member's column and select Block Time.
Choose a block time type: Time Off, Lunch, Custom, Meeting, or Training.
Set the date, start time, and end time, and pick the team member (if not already selected).
Set a Frequency if this block should repeat (e.g. "Doesn't repeat" for a one-off block).
Add an optional description so the team knows why the slot is blocked.
Toggle Online booking allowed during blocked time if clients should still be able to book online during this block.
Click Save. The blocked slot will appear as a distinct card on the calendar.
Blocking time for lunch, training, or a meeting keeps that period out of the staff member's bookable hours without touching their actual working-hours record — commission and shift totals are calculated as normal, unaffected by the block.
After creating an appointment
Once an appointment exists on the calendar, click its card to open the Edit Appointment panel and manage it:
| Action | Where |
|---|---|
| Add more services | + Add service in the panel, same picker as when booking |
| Change status (Arrived, Start, No Show, Cancel) | Status action buttons at the top of the panel — see Status Action Buttons |
| Change client | Change Client button next to the selected client |
| Edit the date/time | Click the pencil icon next to the appointment date, either before or at checkout |
| View client profile | View [Client]'s Profile link — see Viewing a client's profile |
| Modify notes | Notes field in the panel — see Appointment Notes |
| View appointment activity | Activity Timeline — see Visual Activity Timeline |
| Add an expense | See Creating an expense in the Sales Hub |
Checking out on the appointment day vs. the current day
If you're checking out an appointment on a day after it was created (for example, staff forgot to check a client out before closing), the sale date picker lets you choose which date the sale is recorded under. This requires Backdated / Credit Checkout to be turned on in Store Permissions, and only applies when the sale date isn't already today's date.
Going to checkout from the calendar
Once a client's appointment is done, you can take payment directly from the calendar.
Click on the appointment card to open the Edit Appointment panel.
Click Checkout at the bottom of the panel.
The payment screen opens with the services already loaded. Follow the Checkout steps to apply discounts, add a tip, split payments, handle unpaid balances, and collect payment.
At checkout you can also add products, memberships, and vouchers to the bill — note that you can't check out with an unpaid balance if a membership or voucher is in the cart, since a client shouldn't be able to redeem sessions for services they haven't paid for yet.
After checking out an appointment
Once a sale is complete, manage it from the Sale Details panel — click the appointment card, or find it in Sales → Sales Transactions:
| Action | Where |
|---|---|
| Void the sale | Void Sale button — see Void a sale |
| View activity history | Activity Timeline — see Visual Activity Timeline |
| Edit or add notes after checkout | Add / Edit Notes in the ··· action menu — see Sale Details Action Menu |
| Email the receipt | Email Receipt in the ··· action menu — see Sale Details Action Menu |
| Print options | See Sale receipt & auto-printing |
Editing staff details after checkout without voiding
If the wrong staff member was credited for a service or tip, you don't need to void the whole sale to fix it. Open the Sale Details panel and use Reassign Staff from the ··· action menu to correct the assigned staff member — the bill and their commission update automatically, and the fix is reflected in all reports.
Viewing a client's previous information from the Calendar
You don't need to leave the Calendar to check a client's history. When selecting a client in the booking panel, or from View [Client]'s Profile inside an appointment, the same client sheet used across NxCut opens with their appointments, sales, products, vouchers, memberships, and loyalty tabs — see Viewing a client's profile for a full walkthrough of the sheet.
Quick reference
| What do you want to do? | How? |
|---|---|
| See today's appointments | Open the Calendar — each person has their own column |
| Switch to a different branch | Use the location filter at the top |
| Reschedule an appointment | Drag and drop the appointment card to a new slot or staff member |
| Assign multiple stylists to one service | Select multiple team members when adding the service in the booking sheet, or use Staff Split Delegation to divide time and commission |
| Scan a product's barcode | Click Scan Mode in the cart or checkout |
| See if client owes money | Look for the Outstanding Balance badge in the client picker |
| Mark staff member off for one day | Click their name at the top of their column → Edit Shift → toggle Off |
| Check appointment history | Open the appointment to view the visual Activity Timeline |
| Schedule a break | Block out time with Block Time or set scheduled breaks with coverage alerts |
| Peek at an appointment quickly | Hover your mouse over it — a summary pops up |
| Fix the wrong staff credited on a sale | Sale Details → ··· menu → Reassign Staff (no void needed) |
| Checkout a forgotten appointment on its original date | Enable Backdated / Credit Checkout, then pick Use Appointment Date at checkout |